
Hello friends of Marieú Technology Corporation, let’s create a YouTube header or banner in Photoshop! In this step-by-step guide, you will learn how to get the template, import it into Adobe Photoshop, identify layers, edit the presentation, install fonts, and export the project. ✨🎨
Adobe Photoshop is an image editing program developed by Adobe Systems. Among its benefits, it offers compatibility with all Adobe Systems applications, image retouching, color modification, adding filters, effects, and more. Adobe offers different plans focused on business, personal, or academic use.
How to Create a YouTube Banner or Header in Adobe Photoshop?
We will use Envato Elements to obtain the template, which comes with about 10 editable banners. We will also use Adobe Photoshop to import the banner presentation. We will identify each of the layers contained in this template and start including some texts so they can be displayed on your YouTube channel. Finally, we will export the banner, considering the appropriate dimensions for correct viewing. For Creative Cloud Desktop, we will add some fonts and must update the Adobe Photoshop application.
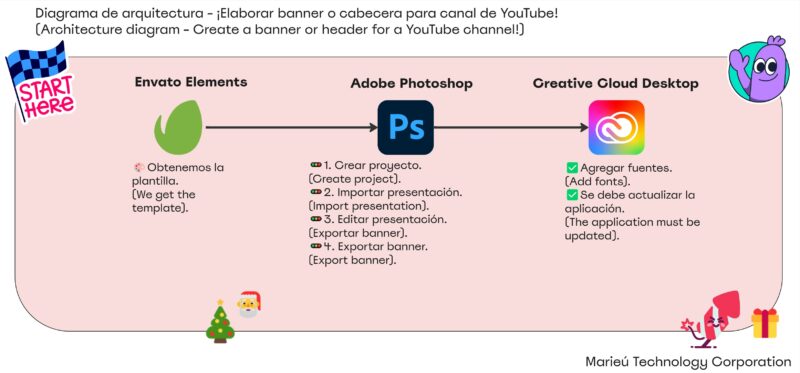
Diagram - How to Create a YouTube Channel Header or Banner!
Source: Author's Own Work.
We are inside Envato Elements, where we will download the template named “Children’s Channel – 10 YouTube Banners.” If we open it, each of these banners is editable. We can change the text, an image, or perhaps a 3D icon. Below, we have some characteristics: it has dimensions of 2560 wide by 1140 high (in pixels). The compatible file type is .PSD, a native Adobe Photoshop format, which we will download.
Once downloaded, we will have it in a .ZIP format, which we will decompress. Inside the first folder, we will find the 10 banners in .PSD format. It also comes with a PDF document for us to download the necessary fonts.
We will select the eighth banner and open it with Adobe Photoshop. A warning about an embedded profile difference appears; we will not convert or delete the embedded profile. We click “Okay,” and there is the banner template.
Now, we will identify the layers. Remember that the area being hidden is the mobile phone view; starting from this guide (the main safe area) is the PC or laptop view. The entire red area is for TV viewing. If you can’t identify it there, you can also differentiate it using the active ruler. Go to View > Guides and activate them.
We have a “new video” layer; if we want to edit the comic cloud, we would do it inside this folder. In the “social links” folder, we have the three social media links: Facebook, Twitter, and Instagram. We have two embedded smart objects; if we want to edit the “Funny” and “Videos” text, we need to do so from these two red layers. To avoid design changes, it is recommended not to modify the “small text” and “Big Text” folders. Finally, we have the background. If we hide the view of any of these layers, we will see the difference. If we want to change the background color, we can do it here.
We will start with the social media links. We select a social network, and it detects some layers. We have the shape and the ellipse. Press “Control + T” and set it to minus 90 degrees. Now, we will place the text vertically. We delete the top and bottom text here. Select “Control + T” and give it an angle of -90 degrees. We will edit the text, inputting “Marieú Technology Corp.” Press “Control + T” and move it. Remember we have a top and bottom guide which marks the display limit for a PC or laptop platform. So, we center it, press “Control + T,” and center it again.
Now we will edit the comic cloud, select it, and change the text. We put “New Videos,” and with the exclamation point, we create a line break—there it is! Now we will change the title and subtitle. To do this, we select and remember to go to the red layer, click “Okay.”
An alert for missing fonts appears. We must install the font to use it. Remember that the .PDF file contains the fonts. How do we identify the missing font? We select the text and see that the font is called “Squirk.” Here, in number eight, we have the “Squirk” font. We are inside the dafont.com page, where we find the “Squirk” font, download it, and unzip it.
Inside the “Squirk” folder, we have the .OTF font file. We open the Creative Cloud Desktop, go to Fonts, and select “Uploaded Fonts.” Here, we will add more. We have the font; we will “drag and drop” it. Check the necessary rights and licenses checkbox to load the font. Add it, and there it is, installed! Photoshop has recognized the font. We see that the missing font alert is gone.
Now let’s edit it. We will write “Marieú.” Once done, we save and go to the presentation, and we see that the text updates automatically. Now, for the subtitle, we must go to the red layer. In “edit small text,” we select and click “Okay.” We can now edit the text. We select the text and will input “Technology Corporation.” It is currently at a size of 120 pixels, which we will change to 110 pixels. There was a small problem with the font, where the letter “o” was being identified as an “n” and a circle, but we left a space and used a new text layer—there it is! We save it, and there we have it.
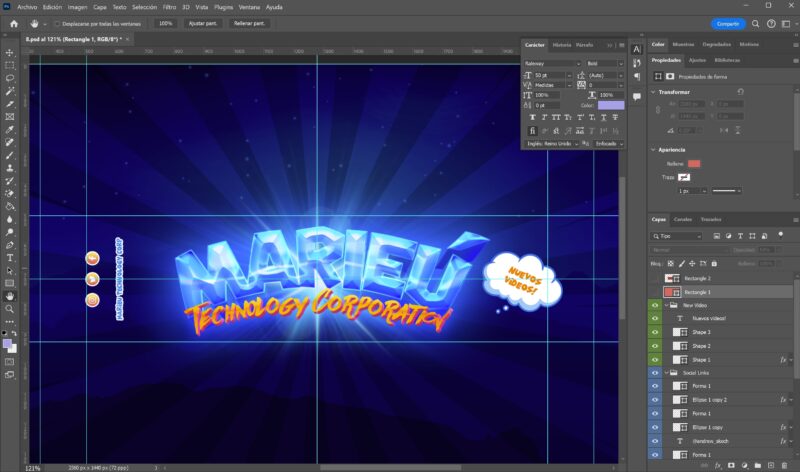
YouTube Banner in Adobe Photoshop.
Source: Author's Own Work.
Final Results
Let’s proceed with the export. To do this, we go to File and select “Export As.” Remember, for this header, YouTube states the following: a size of 2048 by 1152 pixels and a maximum upload size of 6 MB. With this export, for example, we see here that we reach 1002.5 KB, which is much less than 6 MB. We click Export, name it “Banner 2 Marieu Corp.,” and save. The final result is the banner. That’s it, thank you, friends of Marieú Technology Corporation!

THE AUTHOR
Daniel Alejandro Montoya Godenzi
Alejandro, holding a Master’s degree in Administration and Project Management and a Mechatronics Engineer, has experience in digital technology projects. He is part of the Marieú Technology Corporation team. In his free time, he enjoys creating new projects, reading a book, or watching a series.





