
Hello friends at Marieú Technology Corporation, let’s talk about the summer intro After Effects! Indeed, in this step-by-step guide, you will learn to download a template from Envato Elements, identify and open the .AEP file, adjust resolution, edit text, set duration, format, and render the video in After Effects. ⛱️🌞
Adobe After Effects is a motion graphics program, developed by the Adobe Systems company. Among some benefits, you can design animated titles, video introductions, motion transitions, effects for already edited videos, create templates, and more. The Adobe company offers different plans, focused on businesses, personal, or academic use.
How to Create a Summer Intro After Effects Video?
We are going to use Envato Elements to get the template. We have to open the .AEP file. It is a file compatible with Adobe After Effects. We are going to identify each of the files that are within the project. This template comes with a 4K resolution. Internally, we have two texts: the title and subtitle; we are going to edit both. Next, we will look at the duration format. Since it is an intro, we are going to opt for a duration of only 8 seconds. Finally, we have to render the video within After Effects.

Diagram: How to Create a Dynamic Summer Intro?
Source: Author’s Own Work.
We are inside Envato Elements, and here we have the presentation of the summer intro. Some features include a duration of 20 seconds, a resolution of 4K, that is, 3840 by 2160 pixels. The compatible application that we will be able to edit with is After Effects, among other features that this presentation gives us.
We are going to download the intro. Internally, we have the help file. Within the help file, we have the fonts; it is a Claytonia font. They give you the link, and we can download it. In addition, it comes with an image—how would the unedited presentation look? Like this. And it comes with the two files to edit in After Effects. Both files contain the same thing; the only difference is the version.
If we have an After Effects version from 2016 onwards, we can open it with this file. An alert appears in After Effects; since the original file was saved in another version and we currently have version 2024 installed, it alerts us that the original file will not change.
So, we have already opened the project. On the left side, we have all the project folders; we are going to identify each one. The first is the “assets,” where all the intro components are already included; it is not necessary to modify anything there. We also have the “edit components,” which simply shows us the graphics part minus the background. The “edit final,” or final edition, already shows us the background, the text, and the components completely. And the fourth folder contains the first text, which is “hello,” and the second text, “summer.”
Now we are going to look at the resolution. For that, we go to the left side and, in the “edit final,” we right-click and select “Composition Settings.” The template comes with a 4K resolution and 25 frames per second speed. If we want the output to be 1080p, we simply deploy and make the change. If we want to change it to 60 perhaps, we can modify it here, we put 60, there it is! For this summer intro After Effects project, we are going to leave it at 4K, click “Cancel.”
And now, we are going to edit the first text. We have here the layer for the first text, “hello.” So, we select it and, in the composition panel part, we are going to do the following: we have the text number one file, right-click and we are going to select “Open and Edit Original.” Since the original text was edited within the Adobe Photoshop tool, the text will open in Adobe Photoshop. We do not want to remove the embedded profile, nor do we want the template colors to be changed, click “OK.”
So, here, this is an embedded smart object, select it, double-click, and click “OK.” So, here many more layers containing this text are opening. If we remove the view, we will notice the changes in the text. So, there are several layers that this text contains, to give that final effect.
If we want to change the text, we go to the first layer. So, this is where we have to make the change. Remember that a font alert appears here, so we have to install the font. What font is it? Here we have it, it is the Claytonia Demo family, in a regular style, we are going to install it. We have the font, the font link within the help file, here it is. Dafont.com is offering us the font, we are going to download it.
Inside the Claytonia folder, the .ttf file is a font file. We are inside Creative Cloud Desktop, we go to Fonts, click “Uploaded Fonts,” and here we “Add More,” drag and drop. Check the box for font rights and licenses and click “Add.” In our case, we have already added it and we already have the Claytonia font installed within Creative Cloud Desktop. Now we see that it has already recognized the font.
In case a blank alert appears, it simply means that there has been an update regarding the font. To edit, we select and start changing the text. We are going to put “Marieú” and save. You can save it with “Control + S” or, if not, File and click “Save.” Once it has been saved, we are going to close and notice the changes; we see that it updates. We are going to try to center it. For that, we select all the layers. We select the first layer, press “Shift,” and select the last layer.
Now that we have all the layers selected, we press “Control + T.” There we are going to center the text and press “Enter.” Remember that this edition is within an embedded image, so we press “Control + S,” press “Control + S,” and we are going to see the changes within After Effects. So, we have already changed the text. Now we are going to align it to the final presentation. For that, we go to the layer viewer panel, select “intro text 1” and click “New Component Viewer.” So, two layer viewers will be enabled.
The objective here is that, while we move the text, we can clearly notice the final result, if it is framed well within the presentation. On the left, we have the final edit, and on the right hand, we have text number one, the one we made the changes to.
If we move here, we will see how it moves in the presentation. We are going to try to adjust the project panel a bit, to properly visualize the presentation. We are going to increase the scale a bit, we put 50, we are going to vary the position. We reduce the size a bit, to the point where the entire text can be read completely. So, there we can clearly visualize the Marieú text.
We go with the second text, we edit here, right-click, and click “Open, Edit Original.” Double-click on the embedded smart object and click “OK.” There we have all the layers, we need the first layer and click “OK.” We are going to put “Technology” here, select the layer, and press “Control + T” to center the text, and done, press “Enter.”
Remember to press “Control + S” to save the changes. In that case, we also have to reduce the size a bit, “Control + T” and reduce. We select the first layer, go to the end with “Shift,” “Control + T,” and we can make the changes. We reduce the scale a bit, we try to center it. The objective is that the two lines, both horizontal and vertical, appear. We press “Enter” and save with “Control + S,” there we have the changes!
Likewise here, we save with “Control + S” and close Adobe Photoshop. We change here to the final presentation and here, in layer viewer number two, we change to text 2, there it is! We are going to change the scale here a bit, we are going to put 33 and lower it a bit. We go to the timeline and select the space key. So, we see that the texts are adequately located.
Finally, we are going to render the video. For that, we are going to go to the Composition tab and click “Add to Render Queue.” Within the composition panel, we are going to select the “Best Settings.” The Render Settings configuration will be enabled. Within these render settings, we can customize the times. We click “Customize,” we are going to set it for only 8 seconds and click “Accept.”
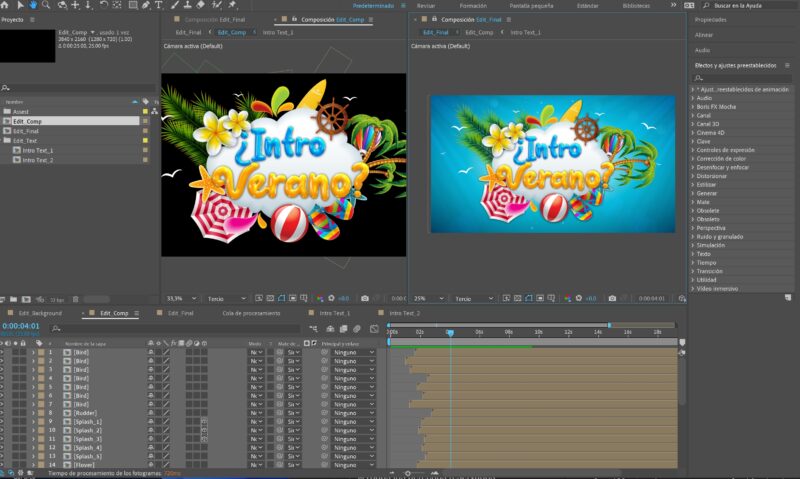
Edit Summer Intro After Effects.
Source: Author’s Own Work.
Final Results
After that, we have the format. We go to the “Output Module” and select “H.264,” the output module settings are enabled. So, here we can change the format; perhaps we only want MP3 sound, or perhaps we want another type of sequence. To import it, we are going to leave it with the H.264 format, “OK.”
And, finally, we are going to place the output: where do we want it to be saved? We put “Marieú Intro” and click Save. We are going to click “Render.” And, finally, we have the following results, there we have “Marieú Technology,” it is a summer intro After Effects video. Done, thanks friends at Marieú Technology Corporation!

THE AUTHOR
Daniel Alejandro Montoya Godenzi
Alejandro, holding a Master’s degree in Administration and Project Management and a Mechatronics Engineer, has experience in digital technology projects. He is part of the Marieú Technology Corporation team. In his free time, he enjoys creating new projects, reading a book, or watching a series.





