
Hello friends from Marieú Technology Corporation, let’s talk about the rank math installation guide and fixing SEO Analyzer Errors! Indeed, in this step-by-step guide, you will learn how to install the Rank Math SEO plugin and improve your website’s positioning.
Rank Math is a search engine optimization tool for a website, located as a plugin within WordPress. It allows you to create and design web pages using templates, widgets, or predefined blocks. The Rank Math installation guide is free and contains basic functions. If you want more features like AI content, it offers paid plans for agencies, businesses, entrepreneurs, and others.
How to Install and Fix SEO Analyzer Errors in Rank Math?
So, here we have WordPress, and within WordPress, we are going to use Rank Math. In Rank Math, we have six total steps to resolve these errors. Point number one: rank math installation guide and account creation. Number 2: we are going to analyze the SEO and obtain the three errors mentioned below. Number 3: we will resolve the first error, “Focus Keywords,” within a landing page. Remember that a landing page is the user’s destination page.
Number 4: we will resolve the second error, which is “Keywords in Title and Description.” Number 5: resolve the third error, “robots.txt.” Finally, we will provide some validations for each of these errors and resolve them. We will use Elementor for the first error with the landing page.
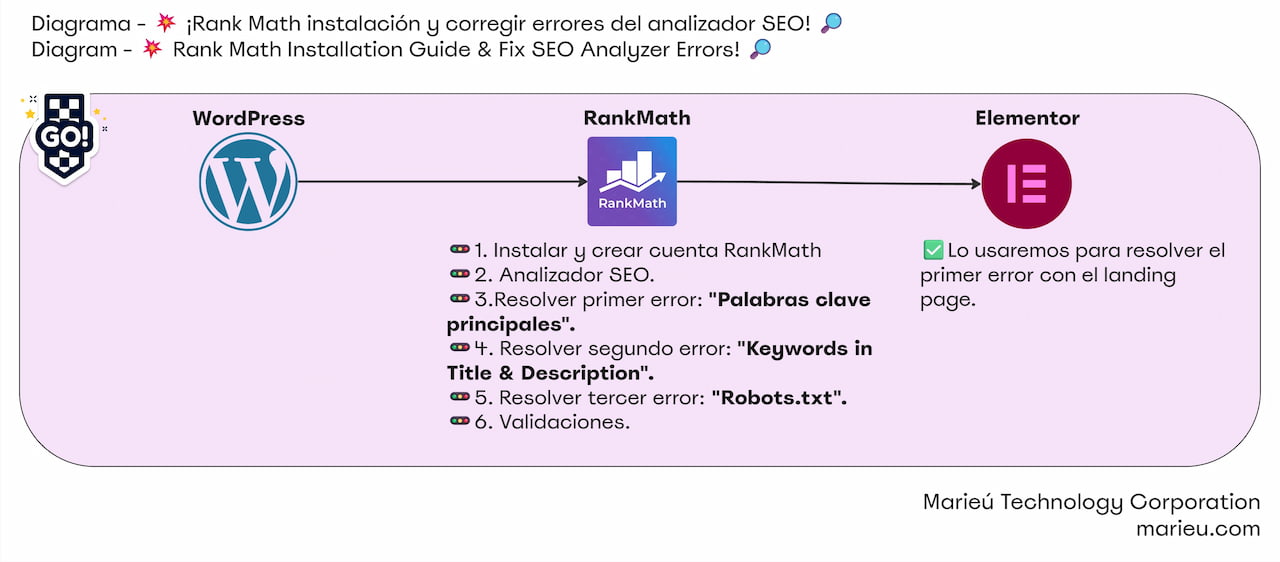
Diagram: Rank Math Installation Guide and SEO Analyzer Errors Fix.
Source: Author’s Own Work, via Miro software.
Here we are in WordPress, and we are going to go to “Plugins”—there it is! In “Plugins,” we are going to click “Add New,” and in the search bar, we will type “Rank Math.” We wait for the search to finish, and there it is! We have the first one, the Rank Math SEO plugin. We activate it, and remember it will ask you to enter your credentials. So, we open Rank Math, click Rank Math SEO, go to Dashboard, and there it is!
In an initial stage, when you do not yet have the account configured, the “Setup Wizard” will appear. So, you activate the plugin, install it, and once you activate it, it will redirect you to a new page. Which page would that be? The one we have here. We complete the steps—super simple!
If it is a free version of Rank Math, it offers two options: “Easy” and “Advanced.” How will this impact us when we configure it? In Advanced mode, it will allow you to have greater control over your website regarding SEO. Many more features will be included, such as the 404 error, how to configure AMP (Accelerated Mobile Pages) much more, among other features. If we are not very proficient, we can simply select “Easy” and let Rank Math handle most of the configuration.
Later, the “Custom” mode is for a Pro (paid) version. We click “Start Wizard.” For this second option, “Your Site,” we are going to select the following. They are asking us about the characteristics of your site. Is it an online store, a blog, a personal portfolio, or something else? In our case, we will leave it as “Online Store.”
Business Type: also, what type of business, what is the field of our business? We assign it. Maybe a gym, a store, a bicycle store, a computer store, among others. In addition, they are asking for the website name. Enter your legal business name. Alternative website name: perhaps a slightly shorter, reduced name. In our case, we will leave it as Marieú Technology Corp. Person or Organization Name: we enter Marieú Technology Corporation, in our case. This is crucial for completing the rank math installation guide.
Next, it asks for the logo for Google. They give you exact dimensions: 112 by 112 pixels. We can edit it with our Adobe Photoshop application, or with some online application. We add it, and that’s where we are going to insert it. We click “Upload Files,” and this is where we will drag it, or upload it from our computer. Once we select, for example, this one, we click “Use this file,” and it loads.
They also request a default social image for sharing. If we use it on Discord, Facebook, or Instagram, when we share the link in the comments or internal messages, the following image appears: “Your logo image plus the text.” Save and Continue.
So, here we are now entering Analytics. We can connect it with our Search Console. Remember that Search Console is for indexing our page with Google. We search for our site and activate it. Analytics at the GA4 level (Google Analytics 4): we search for our account and connect it. If we do not have the Analytics code installed within our WordPress, we can enable this option, and it will be included. If we do not have part of that code, we can install it. The idea is not to install it twice, so that it does not cause a conflict.
And finally, Google AdSense, if we have, perhaps, some paid ad to advertise your product. So, to close the Analytics part, we have the email reports. We activate it, and every so often, data from these analytics will reach your email. We click “Save and Continue.”
So, once we have completed the initial configuration to create our account and link it to our website, we are going to do the following. We are going to go to the SEO Analyzer—there it is! and select it. We have previously performed an analysis.
When it is an initial stage, a button with the text “Start SEO Analyzer” will appear. Once it finishes, a list of approved tests will appear (in green), and in red, there will be failed tests, which are SEO Analyzer Errors that we must resolve. Also, in the case of an exclamation mark, it is a warning. It is informing us what is happening, but we are neither at an approved nor a failed level.
For example, in this case, they are mentioning what the most frequently repeated words on the homepage are: pages, services, page (without “s”), info, plan, marketing, among others. For this case, we will focus on three main errors: “Focus Keywords”—there it is! So, it tells us the following.
There are 28 ElementsKit items and one landing page where the primary focus keyword has not been set. How do we solve this error? In the following way. We select the destination page or “landing page.” There it is! It will take us to the templates and landing page.
Once here, we have to add the focus keywords. We can click here and add the keywords, or we can also click Edit, and here, we add the keywords. We will put “web page,” “marieú,” “minimalist design,” “minimalist design web page,” and ENTER. If you look here, it appears in red, meaning we have some errors to resolve. For example, “The target keyword does not appear in the SEO title.”
We are going to correct it. We can click “Edit Snippet,” and we have the following. We are going to modify it. We clearly see that we do not have “web page” in the title. We are going to change it and put “Minimalist Design Web Page | Marieú”—there it is! We close and validate. So, it says “Hurray! You are using the target keyword in the title.” So, we have already resolved a small error within these keywords.
The next one says: “Add the target keyword to your SEO description.” We go to the description, and here, we are going to put a small description of the web page. We go to the Marieú website—here it is! It offers services for creating a Web Page and Digital Marketing that facilitates business for companies. We will paste it here and close. So, we have resolved the second SEO observation. The target keyword has been used within the SEO description.
And now, we have “The target keyword is not found in the URL” and “Use a target keyword at the beginning of your content.” For the content, we are going to do the following, here! We are going to place some of Marieú’s content. We have some extra content extracted from Marieú’s website. For example: “Marieú offers minimalist design web page services and Digital Marketing.” Some of the processes established for web page development are: web inspection, deep optimization, growth analysis, among other features found on the Marieú website.
Once that is placed, we already have an SEO score of 70 out of 100. We update, and done! So, if we now go to Templates and Landing Page, here we already have our main landing page, and we have added the keywords.
So, we have resolved the first error by adding the focus keywords. Now we go with the second error, which is “Keywords in Title Description”—here it is! For us, it shows up as an approved test, “OK,” in green, because we have already resolved it previously, but we will explain how you can address or approve it.
So, we go to Rank Math, go to the “Title and Meta” option, and here we are going to locate the “Homepage.” So, we have to add the homepage title and a small description of that page. We are going to add “Minimalist Design Web Page | Marieú.” For the description, we are going to put the following: “Marieú offers minimalist design web page creation and Digital Marketing services, facilitating business for companies.” We click “Save Changes,” and done, “Settings Updated.” This completes the necessary steps in the rank math installation guide.
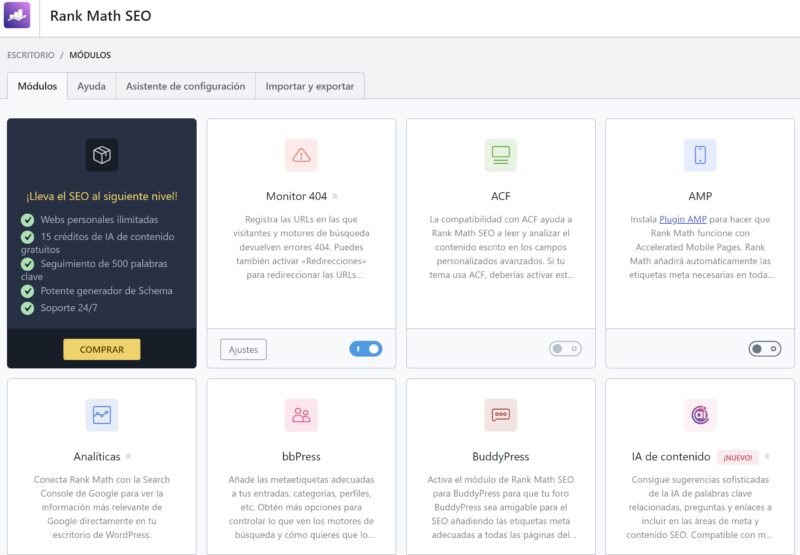
Rank Math Installation Guide in WordPress.
Source: Author’s Own Work, via Rank Math software.
Final Results
So, now finally, let’s look at the robots issue and resolve it. So, for that, we are going to go to the Dashboard, and we are going to switch to Advanced mode. Once in Advanced mode, we click “Title and Meta,” done. Then, we go to “General Settings,” and in General Settings, we go to “Edit Robots.” Now, we have two options. Doing it within Rank Math: if we want to do it via Rank Math, we have the option there, and here we are going to paste the following code. Initially, you install the plugin, activate it, and it automatically installs a robots.txt file by default.
In case you have any error or problem during that Rank Math installation, it will warn you within the SEO Analyzer, as we have seen. It warns you of the error, and we have to solve it in the following way. We put the following code: “Default Robots Rules in Rank Math”—there it is! It includes a rule if these rules are ever deleted from your robots.txt file, but you then want to include them. We copy and paste it here.
What will change? Here! Where it says “yoursite.com,” we are going to put our domain. So, we copy our domain, paste it, and click “Save Changes,” there! In case we do not have this option, or maybe, in case it shows up this way: “The contents are blocked because the robots.txt file is present in each root folder,” meaning we cannot edit it this way, we have to do it within our Hosting. We are going to go to our Hosting—there it is!
Once in our Hosting, we are going to select “File Manager.” We are going to enter all, all the files of the business web hosting. Once in our Hosting, we are going to go to “Domains.” We click here on Staging. In Staging, we will have a file called “robots,” and this is where we will edit it. We copy, paste, and click “Save”—done, friends! So, as a result, we are going to go to the SEO Analyzer, and we have a better SEO score of 75/100. Done, thank you, friends from Marieú Technology Corporation!

THE AUTHOR
Daniel Alejandro Montoya Godenzi
Alejandro, holding a Master’s degree in Administration and Project Management and a Mechatronics Engineer, has experience in digital technology projects. He is part of the Marieú Technology Corporation team. In his free time, he enjoys creating new projects, reading a book, or watching a series.





