
Hello friends from Marieú Technology Corporation, let’s create a product presentation google slides! Indeed, in this step-by-step guide, you will learn how to obtain a Google Slides Template, create a cover, table of contents, product or service models, installation steps, payment methods, and a thank you slide. 📣✨
Google Slides is a service for creating presentations online. You can create or design slides from a template. Furthermore, it allows you to share with your work team, integrate text, images, videos, GIFs, motion effects, etc. This tool was created by Google Inc. and is simple to use.
How to Create a Product Presentation Google Slides?
First, we use Envato Elements, where we will obtain the Google Slides Template. Once we have the template, we are going to convert the presentation. It initially comes in “.Key” format, and we will convert it to “.PPT” format. This is a presentation format for PowerPoint or Google Slides. After that, we will insert the presentation into Google Drive.
We will create a cover slide, a table of contents slide, a definition, service models, installation steps, and finally, payment methods.
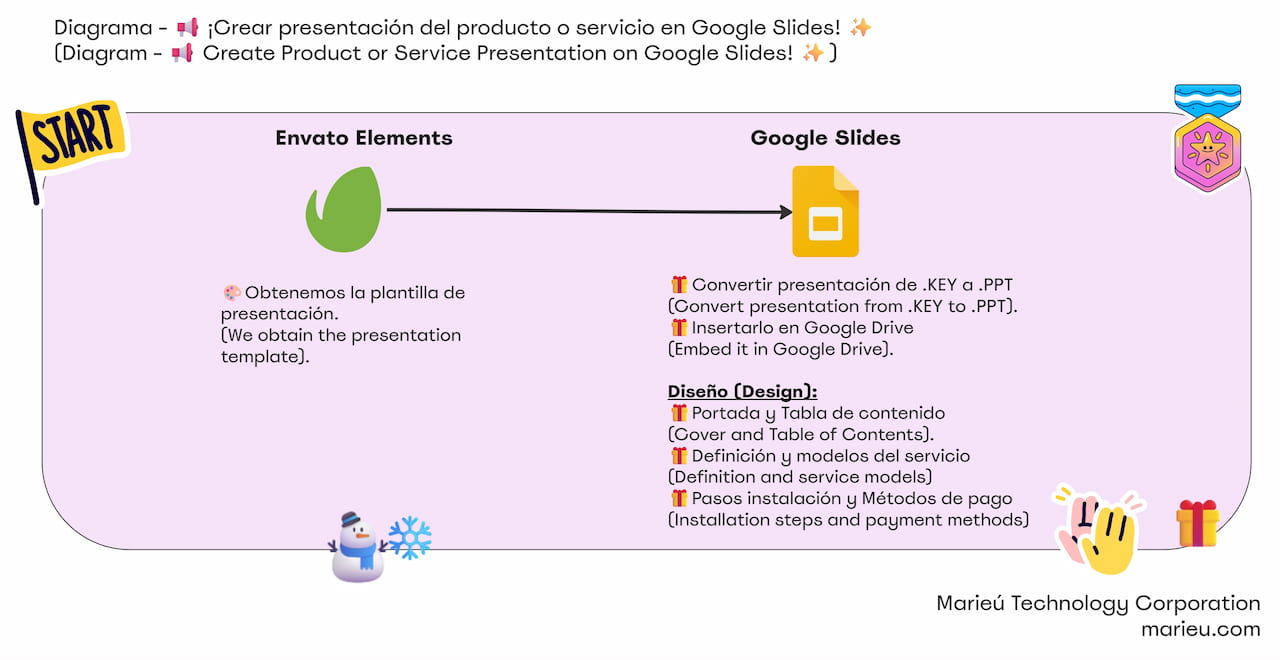
Diagram - Create Product Presentation Google Slides!
Source: Author’s Own Work.
Now we are going to Envato Elements. This “sfrak” presentation, or technology template, is stored as a “.Key” file type. Further down, within the template content, we have some features: 40 internal slide designs, some free web fonts, and other characteristics; we download it. Once we have downloaded it, we will initially have a ZIP file. We unzip it, open the folder, and inside we have the “.key” file. We have already converted it; however, you can convert it in the following way.
If we go to “Online Converter,” we drag and drop the “.Key” file. We wait for it to finish converting, select Start, and it will remain processing. Once it finishes processing, we simply download it.
Inside Drive, we are going to create a folder. Right-click and select New Folder. We will name it “presentation,” we can give it a green color, and we will open it. We have the presentation file in .PPT format here; we “drag and drop” it.
We open the presentation, delete this image, and place our logo on top. To do this, we select Insert Image and click Upload from Computer, then Open. We reduce the size a bit and center it within the presentation. We will assign the company name or business name. For the white text part, we will use 129, and for the orange part, we will use 60. We center it and remove the underlining. In the section below, we simply put the service. We will use a size of 28—there it is!
Now let’s go with the table of contents, slide number two. We start with the image. We select it, click Replace Image, Upload from Computer, select the image you downloaded, and that’s it! In the text section, we will put some information about the company and the products or services it is offering. We continue with the table of contents. We put “About Us” here, here we put “Our Content,” and we will reduce the size a bit to 31.
Inside the table of contents, remember we will show the models and the installation steps: “How to install my email signature,” “How to view my email signature,” and finally, the payment methods. Inside the button, we will put “See More.” What is the objective of this button? If the user selects it, it directs them to the models page.
For this, we are going to focus on the next presentation. We are going to change the background of this circle. We select it, click “Format Options,” and within Format Options, click “Change Color.” We are going to select color 6. Once there, we will insert the 3D image; we insert it into this slide. In the boxes, we will put some service characteristics. In the orange part, we put “Our Services.”
For the title, we have put the name of the service, in this case, “Marieú Email Signature.” A small definition and some advantages of this email signature, and finally, the models. When the user selects this Models button, it will direct them here; it is a file in HTML format. How do we include that link? We select the text, right-click, select Link, insert the link, and click “Apply.”
We are going to put some characteristic texts of the “email signature” service. On the right-hand side, we will put: “How to install my email signature.” For the title, we put Step One. After confirming the payment and confirming the chosen model, we will send you an email with your signature. For the bottom part, we will use an image that helps guide the client. We will add Step Two here, on the left side, and on the right side, we will add a 3D image.
So, here we have the image, and now let’s go with the text. We are going to put: “How to install my email signature.” And we have added Step Two as the title and some description. We will accompany it with an image—there it is! We are inserting a total of two images and we are going to place some arrows. We select Shape, and within Shape, we go to Arrows. We draw the arrow and change the color; we put an orange color. Here below, we are also going to create another arrow; we copy and paste.
Let’s go with Step Three. We will leave the image we have in this slide as it is and focus on the text. Something similar, we will put: “How to install my email signature,” and we will put “Step Three.” We delete the content, and there we have the description, the images, and two arrows.

Email Signature Presentation for Marieu Tech Corp.
Source: Author’s Own Work.
Final Results
Similar to Step Two, we are going to use the next slide within this Google Slides Template we downloaded. We eliminate “service as” and put: “What are our payment methods?” and here our payment methods.
Once we have our payment methods, finally, we will use a slide to thank the client for purchasing our services. For this, we are going to use the last slide. We will put “Thank You Very Much” and the exclamation mark, a size of 110, and here we are also inserting a 3D image.
To conclude, here at the bottom, we will put the company name or business name, and that’s it! So, we already have our final slide to thank the client. That’s it, thank you, friends from Marieú Technology Corporation!

THE AUTHOR
Daniel Alejandro Montoya Godenzi
Alejandro, holding a Master’s degree in Administration and Project Management and a Mechatronics Engineer, has experience in digital technology projects. He is part of the Marieú Technology Corporation team. In his free time, he enjoys creating new projects, reading a book, or watching a series.





