
Hello friends at Marieú Technology Corporation, let’s look at online appointment scheduling without booking plugins! Indeed, in this step-by-step guide, you will learn all the steps for booking appointments in WordPress, editing appointments in Google Calendar, and inserting the appointment schedule on a website. 🗓️🎖️
Google Calendar is a powerful event planning and organization tool for publishing on the web or a digital site. Among its advantages, it allows you to quickly schedule meetings and events, receive reminders about upcoming activities, add a to-do list, location, guests, etc. Its setup is done from its own platform and can be integrated into a website using HTML code. This method is the key to successful online appointment scheduling.
How to Implement Google Calendar WordPress Scheduling Without Plugins?
For online appointment scheduling in WordPress, we are offering two options: the first, having a page already ready within the WordPress editor, and the second, having a page within a page builder like Elementor, Divi, Astra, Orbital Theme, among others. Once we have the entire page ready, we will start by accessing the application. Number two, we will edit the appointment schedule. Number three, we will insert it into the website we created in WordPress.
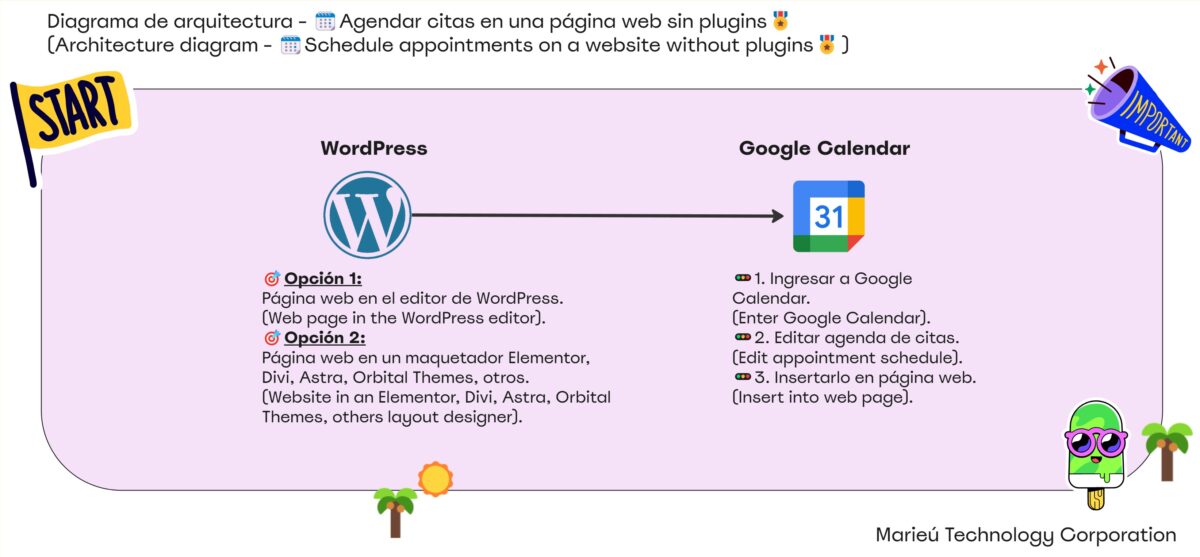
Diagram: Online Appointment Scheduling Without Plugins!
Source: Author’s Own Work.
We search for “Google Calendar” and select the first page. By default, if we already have a Gmail account, this Google Calendar application will be enabled. Remember that this Gmail account can be personal or also Enterprise. We are presenting it as an option for a free or personal account offered by Google.
We go to this section, enable create, deploy the create option, and “Appointment Schedule” will appear here. We select it, and the following window is enabled. We have the entire calendar for the month of February on the right hand, and on the left hand, we have the configuration that we will gradually apply. As a title, we have placed “Marieú Technology Corporation.” It is advisable to put the name of your company or business to generate a “little” more customer trust when they use your online appointment scheduling.
Appointment duration: in this case, we have scheduled it for 15 minutes. If you want to increase the time a little, we have the following options: 30, 45 minutes, one hour, among others. General availability: within this section, you can simply filter which days you do not wish to enable these bookings. We select here, unavailable on Monday, and remove it, there it is! Let’s imagine that we want to limit it so that bookings are not made from one to two.
If we land on Tuesday, we click “Add Another Period on This Day” and we limit it to run from 8:30 am to 1:00 pm, and from 1:00 pm to 2:00 pm, let it be the lunch break, and we schedule the appointment starting at 2:00 pm. It would be from two and they can stay until 6:00 in the afternoon. If we visualize here, within the calendar, we already have a lunch space, in which the client will no longer be able to reserve.
Afterwards, we also have the scheduling window. It limits what is the maximum and minimum time before scheduling an appointment. It can be the same day, with 4 hours’ notice. What would be the maximum time? It would be 60 days before booking an appointment.
In case we wish to place an adjusted availability, specifying what hours are available on specific dates, we can specify it. Then, the client, perhaps, will be able to choose another day and not within those hours. We are going to leave it by default, we are not going to assign any availability. After that, we have the booking appointment settings. Here, we can place a period duration between appointments, that is, if we schedule an appointment at 10:00 am and 11:00 am, we can place a 30-minute break to start the next appointment.
In addition, we can place a maximum number of bookings per day, it can be four, five, as many times as you wish. Finally, the calendar option, where appointment availability is verified.
If a customer has already booked on Monday at 11:00 am, the option will no longer appear within the calendar for another customer to book it. In addition, we can change the color. We can put a red or yellow color, we notice the change on the right hand. Remember that you have a free account, so we can only create one booking calendar. If we want to opt for more, Google already offers us the option of being able to purchase a plan. What would that plan be? We have it here: Premium plan, where it offers many more features compared to the free plan, we are going to click “Next.”
We already have a title, we have the photo, the name of the booking page. It will appear like this, in the following way. In case we do not have it, we can manage the name in this link.
So, here we are within the Google account, for Marieú Technology Corporation. We go to personal information, and here we can make the changes. We have the name, the date of birth, in this case it is Marieú’s, and the gender. If we want to change the photo, we do it in this section, here we can change the photo.
Once we have that, it will be updated, and we would have it here. You can opt for a Google Meet video conference, an in-person meeting, a phone call, or perhaps specify later, we are going to opt for the first.
After that, we have a description, in which we offer web page creation services, digital marketing, and audiovisual production, which facilitates business within companies. Next, we have a booking form. This form will allow us to obtain customer data. For example, important fields, which are already by default and cannot be removed, are the name, last name, and email address. If we want to add many more fields, we do it here. We add elements, and here we can add a custom field or, if not, a telephone number field, “OK.” We have added two fields: telephone number and country.
Finally, we have the confirmations and reminders for the bookings. So, if we deploy here, we enable the calendar invitation checklist, that is, when the customer books it, they will receive a notification to their email address. And, finally, we click “Save,” it will appear in the following way. This online appointment scheduling system will start from the day you have configured it. In our case, we have configured it from the 9th, so it is starting from Friday the 9th. If we move a week here, there we have all the appointments that have been previously configured, except Sundays.
How can we share our website? We select here, we go to “Embed on your website.” We have two options: a button, where a pop-up window will appear when the user selects it, or option two, the embedded booking page. We are going to opt for the first, the button with a pop-up window. We deploy, and here we have the name and the color that we are going to add, within this button.
We are going to put a particular color from our website. For that, we are going to go to WordPress. We are already in WordPress, we go to Pages, click “Edit with Elementor,” we go here to “Site Settings” and we go to “Global Colors.” A color that we use, which passes the accessibility filter.
By the way, I will leave the link to the course we are offering in the description, to optimize your website. We go here, copy the hexadecimal code, and paste it here. We click “Save,” and we already have the button color. In addition to that, we are going to change the text, we put “Book a Free Appointment,” with an exclamation mark. The button code is automatically generated. It is an HTML code, we copy the code, we are going to paste it here, within Marieú website prices. How do we insert it inside the page? We go here, look for the HTML widget, and we have it here, we insert it.
We have it here; this widget has an HTML code section, we simply paste it there. We copy the code and paste it here. Once it’s there, remember to Update.
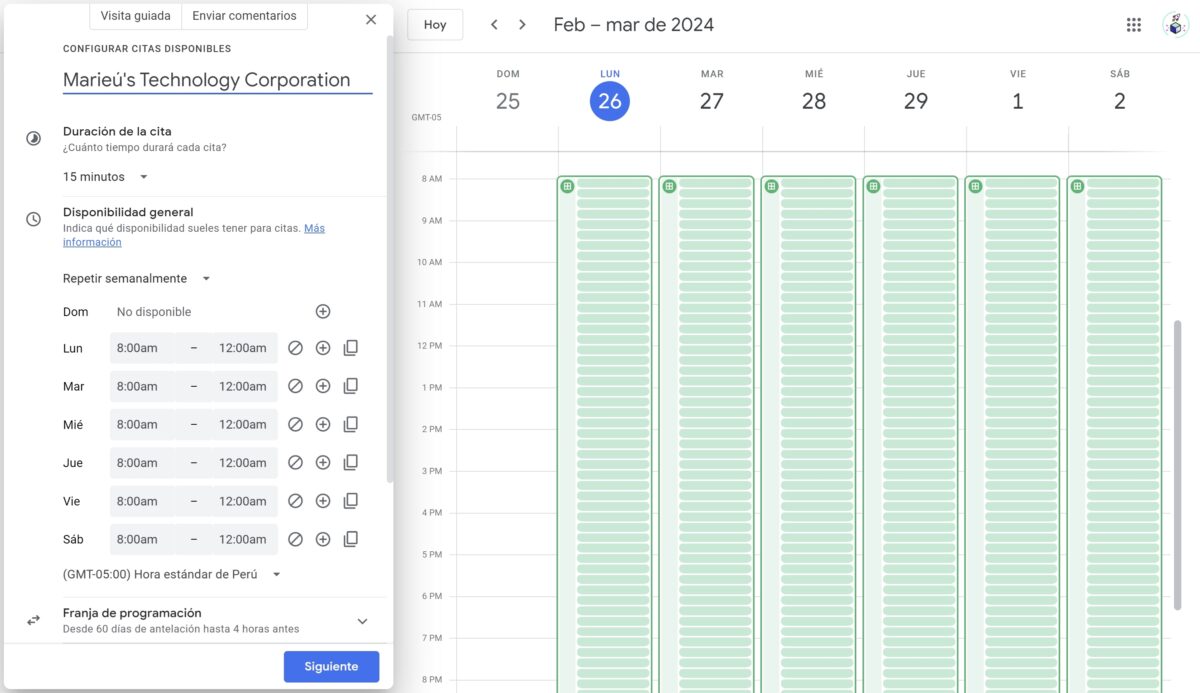
Edit Appointment Schedule with Google Calendar.
Source: Author’s Own Work.
Final Results
So, here, we simply scroll to the video section, and here, we have the booking button. We click “Book a Free Appointment,” and the booking window or pop-up is enabled, there it is! If, for example, we select any of these bookings, for example, Wednesday the 14th, at 8:45 am, this small window is already enabled, where the name, last name, address, telephone number (which is optional), and country can be included. This is the result of using Google Calendar for efficient online appointment scheduling. Done, thanks friends at Marieú Technology Corporation!

THE AUTHOR
Daniel Alejandro Montoya Godenzi
Alejandro, holding a Master’s degree in Administration and Project Management and a Mechatronics Engineer, has experience in digital technology projects. He is part of the Marieú Technology Corporation team. In his free time, he enjoys creating new projects, reading a book, or watching a series.





