
Hello friends at Marieú Technology Corporation, let’s measure customer satisfaction with a MailerLite survey! Indeed, in this step-by-step guide, you will learn to create a landing page site in MailerLite, assign a subscriber group, select a survey template, and edit and configure your MailerLite survey. ⭐🚀
MailerLite is an email digital marketing service platform. Some of the tools it provides include email campaigns, subscriber segmentation, integrated forms, and more. The installation of the MailerLite plugin registration form is done through WordPress, where you can integrate a form on your page and store subscribers.
How to Measure Customer Satisfaction with a MailerLite Survey?
We are going to use MailerLite. We will create a landing page type site. We are going to select a template that has the form of a survey. After that, we are going to edit the presentation, add some buttons, edit the header, and finally, configure the page. We are going to assign a particular URL for this MailerLite survey, we will place SEO keywords, link it with Google Analytics 4, and add a Favicon icon.

Diagram: Survey to Measure Customer Satisfaction!
Source: Author’s Own Work.
We are going to use MailerLite. We will create a landing page type site. We are going to select a template that has the form of a survey. After that, we are going to edit the presentation, add some buttons, edit the header, and finally, configure the page. We are going to assign a particular URL for this MailerLite survey, we will place SEO keywords, link it with Google Analytics 4, and add a Favicon icon.
We are inside MailerLite. We are going to go to Sites. Within Sites, we are going to create a new landing page. We click “Create Site.” Here we are going to add the name, we put “Marieú Questionnaire.” The type of website would be a landing page in this case. We click “Save and Continue.”
A subscription page allows us to include some subscribers from our database and send them the link. We already have a group created, “Marieú Corp. Survey.” We are going to select our group and click “Continue.”
The next section is selecting the template. In particular, we are going to go into the categories and look for “Survey.” We select it, and we have the following templates. We are going to select the first survey, click “Choose.”
We are now inside the editing page of our landing page. We have the header part, we have a title, a subtitle, small comments, and we have the main thing, which is the questionnaire. We will start with the header edition. We select “vlogger,” we change the logo. You can add it here.
If we want to upload a new image, we click “Upload Image,” and we can upload our image. We have it here, we click “Insert.” We notice that the logo is very small. We are going to increase the height and width a bit. For that, we go to Settings and, in Settings, we go to Content Styles, select Logo, and increase the height to 75. We click “Save.”
In addition, we are going to modify the vertical space; we will reduce it a bit to about 20. Regarding the content width, we are going to select it to be Medium. Now, one more change within the header before entering the title, we select the button, and we are going to add borders. Within Corners, we will increase it to 30, and there it is, and there we notice the change!
To notice the difference, when the pointer is over the button, it should be a little darker. We modify that within the Hover settings. We click “More Color” and select a darker color, click “Save,” there it is, there we notice the change. Let’s go with the title: “Can we ask you…” Within the paragraph, we are going to put “To provide you with better service…”
Great, so we already have the paragraph. Now we are going to go into the questionnaire section. We start with the intro. If we select the questionnaire or survey section, three configurations appear: the questions section, the rules, and finally, the settings. Within Questions, we are going to change the text. We select the pencil edit icon. In Questions, we are going to put “We value…”
In the description, we select it, and in the question, we are going to put: “Can you help us…?” After the description, we have the button. We are going to assign the following: “Ok, I have 2 minutes,” and we are going to change the button radius. For that, we go to Settings and in the CTA or Call to Action, we change the corners to 30 and click “Save.”
And now, we go to the second question. Once the user accepts, they will go to the second question. We are going to select “Multiple Choice.” Our goal here is to list all our services and have the customer select by service. So, for that, we first select the question and edit. Within Question, we are going to formulate the following question: “Which service…?” and, in the description, “Please select…”
Within the question, we are going to change it to plural. Perhaps I can hire more than one service in a single purchase. For that, we have to activate multiple answers or “Allow Multiple Answers.” We change the name of each of the products. We can leave the button text by default, with “Continue.”
Similar to the button, we are going to go to Settings and, in Settings, we are going to add a little border. Within Corners, we increase it to 30, click “Save,” and there we notice the change. Now we are going to enter the third question, which is NPS or Net Promoter Score—the net score of the promoter or user. We select it, and there we have the scale from 1 to 10. Internally, we are going to formulate the question. For the question, we are going to put “How likely…?” and, in the description, we are going to leave it blank.
The negative label: we are going to specify it so that the client is not confused. We are going to put “Not likely at all” and “Very likely.” Regarding the color scale, we are going to assign it Colorful or attractive. From one to six are detractors, from seven to eight are indifferent, and from 9 to 10 are promoters. That is the scale regarding the NPS. We click “Edit Changes.”
For the fourth question, we are going to select the open-ended question. We click Edit and we are going to put “Do you wish…?” here. In the description, we are going to put “You can…” Regarding the Button, we are going to put “Next,” click “Save Changes.” For the fifth question, we are going to thank the customer for the time they dedicated to answering our MailerLite survey. We select the pencil and put “Thank you…” In the button, “Thank you very much…” Once they finish selecting “Thank you very much,” they will be directed to our main page.
We are now inside the main page. We copy the URL and paste it, click “Save Changes.” We are going to delete questions six and seven. In the case of Survey Rules, we can add some conditions. If the user correctly answers question number two, they can skip to four or, perhaps, skip up to a fifth slide. We are going to leave it by default; we are not going to add any rules, and finally, we click “Save and Publish.”
Once here, we are going to configure the page. We have two options: place a default URL, which is subscribe.io, or, if not, we can add our domain. We are going to add a domain, click “Add Domain.” In case we already have content within our main domain, we recommend that we use a subdomain. We are going to create a new subdomain. It will be called surveys.ourdomain.marieu.com. We create a custom folder for that subdomain, we put surveys. We click “Create,” copy the subdomain, and paste it here, and done! So, now we have already added a subdomain. Let’s go with the DNS status.
So, we have to create a CNAME Record for each one, for the name and for the value. So, we are already inside the DNS, inside our Hostinger, and we add the record. Once we have added the domain, we are going to manage the DNS. We open the DNS. We are going to create an A record with the name of surveys, and we have the value. We copy the NAME, add the record, DNS record created successfully, and done! We have both the record and the SSL certificate active. So, now we do have the option to add our subdomain, and we are going to name it Net Promoter Score.
After that, we are going to add the favicon. Remember that the favicon is the icon that we can visualize within a web page; for example, here we notice an icon, it is the favicon. So, we are going to select our favicon, click “Update Image,” select our favicon. It looks a little pixelated because remember it is 32 by 32 pixels. We are going to enter the last configuration, which is at the SEO level.
If we want this landing page, in survey mode, to be shown in Google search results, we have to complete the SEO configuration. What would be the title that appears in Google results? We have it here. We are going to put “Survey…” Some keywords, that is the description. Remember, they are keywords that the user initially enters to find your web page. We put: “Marieú Survey…”
Now let’s go with the description. Remember that the description is what appears below the title. We are going to put in a question mark: “Our…” We have a checkbox. If we want it to be indexed, they are indexed and appear in the search results. We say yes, we check the checklist, and we are going to go with Social Share. We visualize it when we share a link on WhatsApp, Facebook, perhaps TikTok. The title, image, and a small description appear.
We are going to give it a title, which is similar to the SEO title, and the description too. For example, here we have a model. When you share a link, we clearly visualize the title, the description, and the image.
And now, we are going to create the image “Update Image” and assign the following image. It is an image on the left hand, and on the right hand, it is text. We are going to select it, and finally, what are the analytics. So, here we are going to paste the Google Analytics ID. We have a video in particular to obtain this ID.
In the case of Facebook Pixel, we are going to leave it as it is. We do not want to disable tracking data. The click heatmap, or heatmaps, we are going to enable it to provide tracking within this landing page: where the user is clicking. In the case that we have activated a popup for all the subdomains we have created, an alert will appear, but, in this case, it is not necessary since it is only a survey.
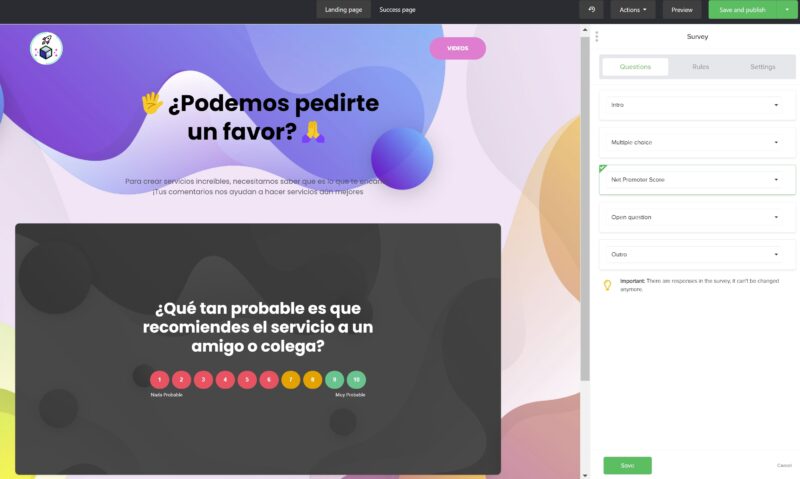
Edit MailerLite Survey.
Source: Author’s Own Work.
Final Results
The head code and the body code, we obtain them from Google Tag Manager. We copy the head part and paste it here, we copy the body part and paste it here. Automatically, it would be inserted both in our header and in the body of the landing page. So, there we have it. Double authentication is not necessary since it is a survey, we disable it, and here we have a preview. In desktop version, we have it like this. We activate the video option, and it takes us to the Marieú Corp. channel.
If we want to start with the survey, we simply select the button and start the survey. In the case of Mobile, we have the title, and below here, we have the survey. OK, the user starts to take the survey. This is the successful deployment of a MailerLite survey. Done, thanks friends at Marieú Technology Corporation!

THE AUTHOR
Daniel Alejandro Montoya Godenzi
Alejandro, holding a Master’s degree in Administration and Project Management and a Mechatronics Engineer, has experience in digital technology projects. He is part of the Marieú Technology Corporation team. In his free time, he enjoys creating new projects, reading a book, or watching a series.





