
Hello friends at Marieú Technology Corporation, how to install Google Tag Manager in WordPress? Indeed, in this step-by-step guide, you will learn to create a GTM account and insert the installation codes in WordPress. 🎁🚀
Google Tag Manager is a digital tool from Google that allows us to manage tags on a website. Tags are code segments, applied to a web page, that allow us to track customer interaction.
How to Install Google Tag Manager in WordPress?
For the WordPress side, we need to have the Elementor plugin updated. For Elementor, Method Number One, we are going to create a new Custom Code. For Method Two, we have to do it within the “Theme File Editor.” In both cases, we will add codes so that Google Tag Manager can detect the tags installed within your website. This process is crucial when you seek to install Google Tag Manager in WordPress successfully.
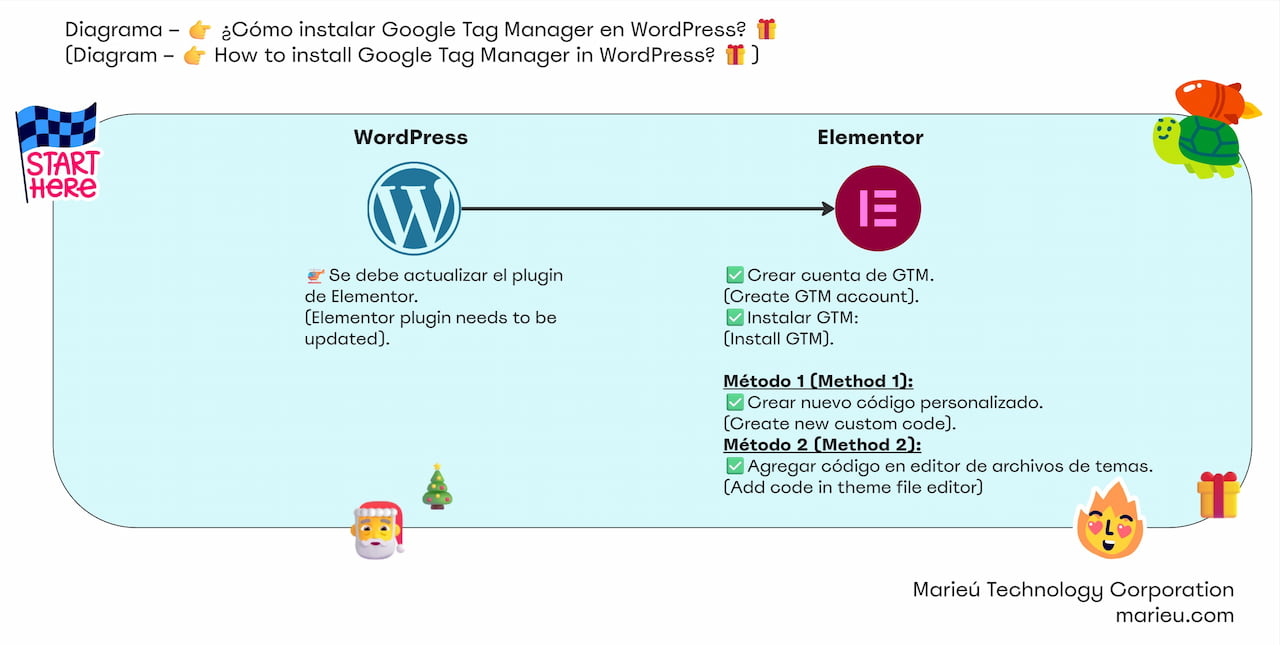
Diagram: How to Install Google Tag Manager in WordPress?
Source: Author’s Own Work.
We are going to enter Google Tag Manager (GTM), select the first result. Then, here we are going to click “Start for Free.” It directs us to a platform where we have to enter our Company Name and Country as the account configuration: “Marieú Technology Corporation,” country, we put “Peru.” We select the checkbox to convert the data so that Google can generate some trend reports, comparing with other websites.
After that, it will ask you for a Container Configuration. We add our domain and select the platform type. In this case, it is a website, and finally, we click “Create.”
After having created it, it will direct us to the Google Tag Manager administrator. The name, the account configuration, some account activities, and user management appear, in case we want to share with a member of our company. Within the container, we will find some configurations, also the user manager, and the main thing here: how to install Google Tag Manager in WordPress? We select “Install,” and this window appears, which provides us with two codes: one for the <head> and one for the <body>. We are going to insert both codes into WordPress.
We are already inside WordPress. We are going to go to Elementor. Within Elementor, we are going to enter “Custom Code.” If we want to add from scratch, we simply click “Add New,” and here we are going to put a title: “Google Tag Manager Head.” Location: inside the <head>. Perhaps we find it as “body start” or “body end”; we have to change it to “head”—it is the code that will go inside the header. We go to the <head> code of Google Tag Manager, copy, and paste it here.
Once there, we click “Publish.” Let’s go with the <body> code. We add a new one, and we are going to put “Google Tag Manager Body.” We copy the <body> code and paste it here. Finally, we click “Publish.” After having published each of these Custom Codes, both for the body and for the head, we would have it as follows. Here we would have the “Body” and we would have the “Head”; both must be published. For both cases, remember that the priority is a priority of one.
To test up to this point, we can insert our domain into Google Tag Manager. We put our domain and perform the test. For example, here, the test has passed; we have an approved checklist, and the <head> code and the <body> code would already be correctly installed within our website.
This successful GTM Installation means you’re ready to track. We are going to go with Method Number Two. For this, we are going to locate ourselves within the “Theme Editor.” We go to “Appearance” and click “Theme File Editor.” Inside the editor, we are going to locate the Header, header.php, and here we are going to paste both codes. We have the <head> and we have the <body>. We copy the <head>.
Within the code, we are going to identify it. We have the opening <head> tag, and we have the closing </head> tag. So, we go to the <head> at the very top, leave a space, and paste. Since we are modifying the Theme Editor, remember that for a reliable install Google Tag Manager in WordPress, always generate a backup copy. Due to some error, some failure, we delete some part of the code, and it can generate problems on our website.
So, we have already placed the <head>. Now we are going to go with the <body>. We identify that we have the <body> here. We copy the <body>. After the <body>, we insert a break and paste it, remove that break, and done. After that, we can update the file.
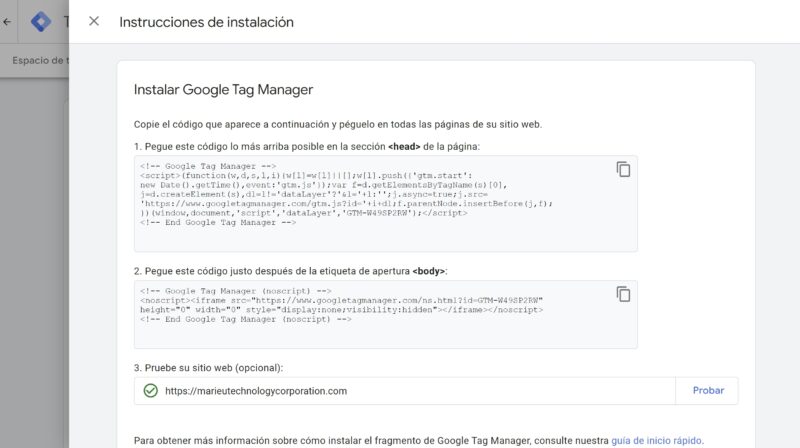
Google Tag Manager Installation Test.
Source: Author’s Own Work.
Final Results
Once this is done, we go to your site tests. We paste your domain here and perform the test. It is not necessary to insert both methods; one is enough for the test to work, and it would be ready. There it is! Success checklist. You now know exactly how to install Google Tag Manager in WordPress. Done, thanks friends at Marieú Technology Corporation!

THE AUTHOR
Daniel Alejandro Montoya Godenzi
Alejandro, holding a Master’s degree in Administration and Project Management and a Mechatronics Engineer, has experience in digital technology projects. He is part of the Marieú Technology Corporation team. In his free time, he enjoys creating new projects, reading a book, or watching a series.





