
Hello friends from Marieú Technology Corporation, the best email marketing strategy! In this step-by-step guide, you will learn how to set up the MailerLite plugin in Elementor and WordPress.
MailerLite is a digital email marketing platform. Among some of the tools it provides are email campaigns, subscriber segmentation, integrated forms, and more. The registration of your elementor form mailerlite is completed by installing the official MailerLite WordPress plugin. Where you can embed a form on your page and securely store subscribers.
How to Create an Elementor Form MailerLite?
To integrate MailerLite in Elementor, here we have the architecture diagram of HTML, Gmail, WordPress, and MailerLite. We have two options for this connection. The first option is to integrate the form directly into Elementor’s editing widget. Within that, you get the option to include MailerLite—there it is! You can add the MailerLite option and, internally, input the API Key. With the API Key generated in MailerLite, we can find all the fields in the form.
If we have added important fields like name, email, ID, age, and date of birth, and these fields match the fields inside MailerLite, the option is enabled—there it is! In this case, the form is simply for name and email, and both were activated. Unfortunately, why did we discard this alternative? Because it only stores subscribers but does not allow us to send emails securely to our inbox, unless we install an SMTP (Simple Mail Transfer Protocol).
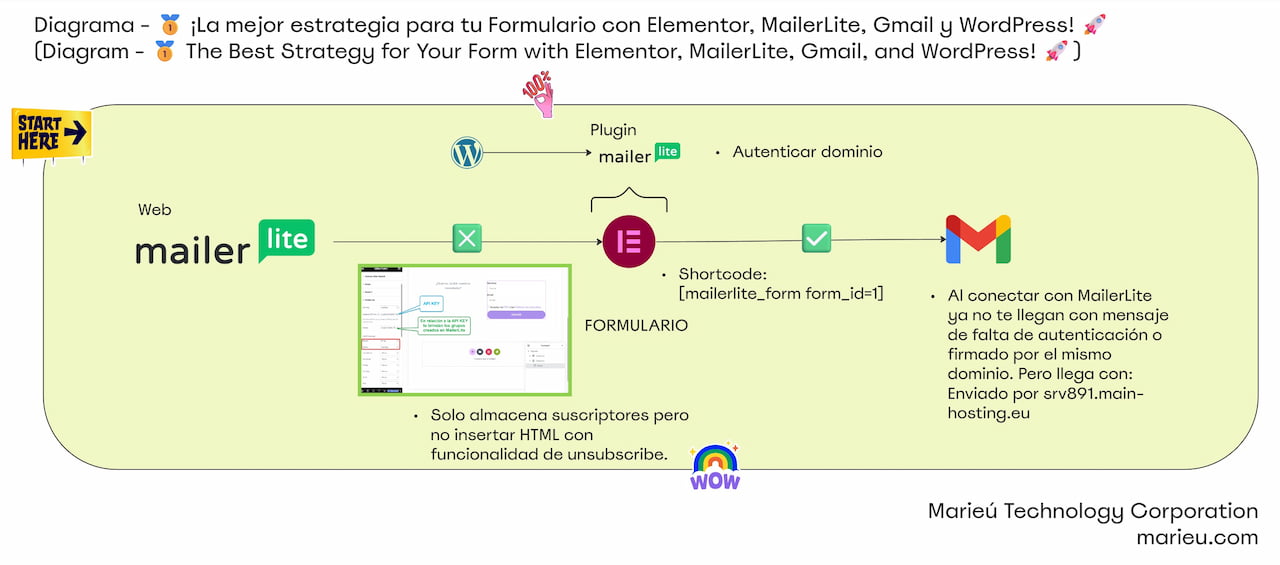
Diagram: Elementor Form MailerLite Registration Flow.
Source: Author’s Own Work, via Miro software.
If we install the SMTP protocol, we could easily receive emails in our Gmail without any alerts. What kind of alert would we receive if we don’t install that protocol? This message: “Be careful with this message.” The goal is for the email to be trusted and not display this alert when we send it to the client. That is why we discarded this option, as it requires an additional plugin. It only stores subscribers but does not allow inserting HTML with an unsubscribe function. We can insert HTML, but the unsubscribe function is not possible.
What is the alternative we have implemented? It is through the MailerLite WordPress plugin. When you install the plugin, the domain is already authenticated because it comes directly from the platform. We include it within Elementor using shortcodes—this is the code, super simple. This is the generic code for everyone. If there is a second form, simply change the ID to 2. For now, it is only ID equals to 1.
So, once you put ID equals to 1, when connecting with MailerLite, you no longer receive those messages about lack of authentication or lack of domain signing. If we connect using the MailerLite WordPress plugin, how does the message arrive? We have the model here. The alert message no longer appears. We include HTML, and the alert message and lack of trust are gone. Why? Mainly because in this case, it appears as “signed by the domain.” Let’s compare; here, “signed by” does not appear. So, we’ll stick with this option.
Well, now let’s start. To complete the entire integration, we must have our forms ready inside MailerLite. In MailerLite, you simply sign up, enter your details, and you have your account. It offers a 30-day free trial, and after that, you can choose a plan. If we take advantage of these first 30 days, we can set up the following. We go to Forms, and under Forms, we click Create.
Once we create our form with basic data, we will have the following. In this case, we created two. The second one is a test we were generating, but for the first one, we created a basic form. We open it, click “preview,” and we have a basic form: name, email, and a checkbox to accept the terms and conditions and privacy policy, plus the submit button. How can we share it directly? If we don’t want to embed it directly in Elementor, we copy the link here. Once we have the form created, we will embed it using the shortcode.
Now, in WordPress, we are going to install the MailerLite plugin. In our case, we have already installed it, but we will show you how you need to install it. Add New and search for MailerLite—there it is!: Signup forms (official). Once you install the MailerLite WordPress plugin, you activate it and go to the bottom section to open MailerLite. When you initially confirm MailerLite, it will ask you to use your credentials. Once you enter your credentials, you can view your forms, alright?
Here you will find several forms, in case you have created multiple. In our case, we set one for the main page. If we click Edit, we’ll see it—there it is! We saw it in MailerLite. How do you activate it? For example, our ID in this case is 2 because there was an error with the first one, and we had to formulate a second. So, in this case, the ID would be equal to 2. When you enter the API Key, it will link to your MailerLite form.
How do we enter the API Key? Here’s how. This is the form, and you generate the API Key here, under Integration, then API. Click “Use,” and create a new one. When you create a new one, a .txt file appears, and inside the .txt file, the entire API code appears; copy that API code.
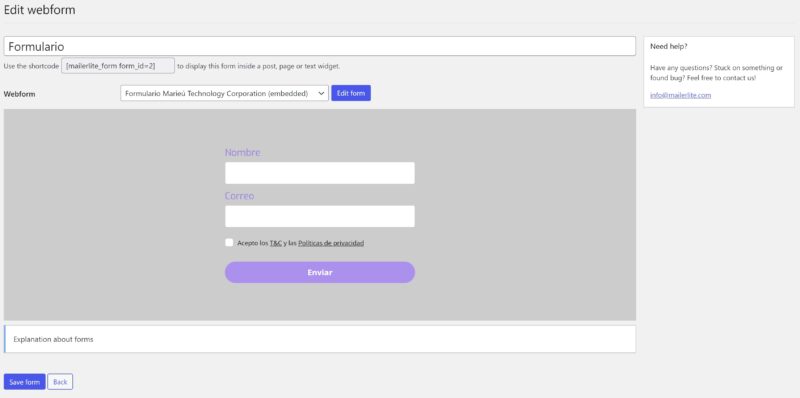
Connecting MailerLite to WordPress.
Source: Author’s Own Work, via MailerLite software.
Final Results
For example, we have three; we created three. Once you have the API code, you paste it directly here: Settings, paste it, update the API Key, and all the forms linked to your account appear. When you want to go directly to the Home or main page, we go to Pages. We enter the main page—there is the main page!
Where should we include the form? We are going to embed the form. We open the navigator, approximately in this section, a little more, and there it is! How do we include a shortcode from scratch? Remember we saw it in the previous video. We use widgets and shortcode, select it, and drop it. Once you input the shortcode there, it will appear like this, ready for you to enter the code.

Final Elementor Form MailerLite Results.
Source: Author’s Own Work, via MailerLite and Elementor software.
In our case, as we commented, the ID is equal to 2, mailerlite_form form_id=2, we apply it, and that’s it! There is one detail: the preview is not visible, but if we want to see it directly on the page, we click “Preview Changes” here. It is not visible in the editing preview, but it is visible in the preview of the entire page—there it is! The elementor form mailerlite is now included. That’s it, thank you, friends from de Marieú Technology Corporation!

THE AUTHOR
Daniel Alejandro Montoya Godenzi
Alejandro, holding a Master’s degree in Administration and Project Management and a Mechatronics Engineer, has experience in digital technology projects. He is part of the Marieú Technology Corporation team. In his free time, he enjoys creating new projects, reading a book, or watching a series.





