
Hello friends from Marieú Technology Corporation, let’s learn how to create a custom search for wordpress! Indeed, in this step-by-step guide, you will learn to create an archive template, configure a widget, add styles, and change the language for the Elementor Search Results. As a complement, we will teach you to add a header and footer to enhance the design of your custom search for wordpress. 🔎🚀
Elementor is a web page builder or “page builder.” It allows you to create and design web pages using templates, widgets, or predefined blocks. The installation of the Elementor plugin is done through WordPress. There, you will find a free version and a paid version, the latter offering a greater number of widgets and templates.
How to create a custom search for wordpress?
In the case of WordPress, we have to update the Elementor plugin to avoid some errors that we might have during configuration. For Elementor, we are going to create an Archive template. With the template created, we will add an “Archive Title” widget and an “Archive Post” widget. We are going to configure the content, go to the style section, and use some tricks to change the language displayed in the Elementor Search Results.
Next, we will add some conditions. When do we want this custom search for wordpress to appear? Will it be on all pages, or perhaps only on a Blog page? Finally, we will assign a header and a footer to appear when these Elementor Search Results are displayed.
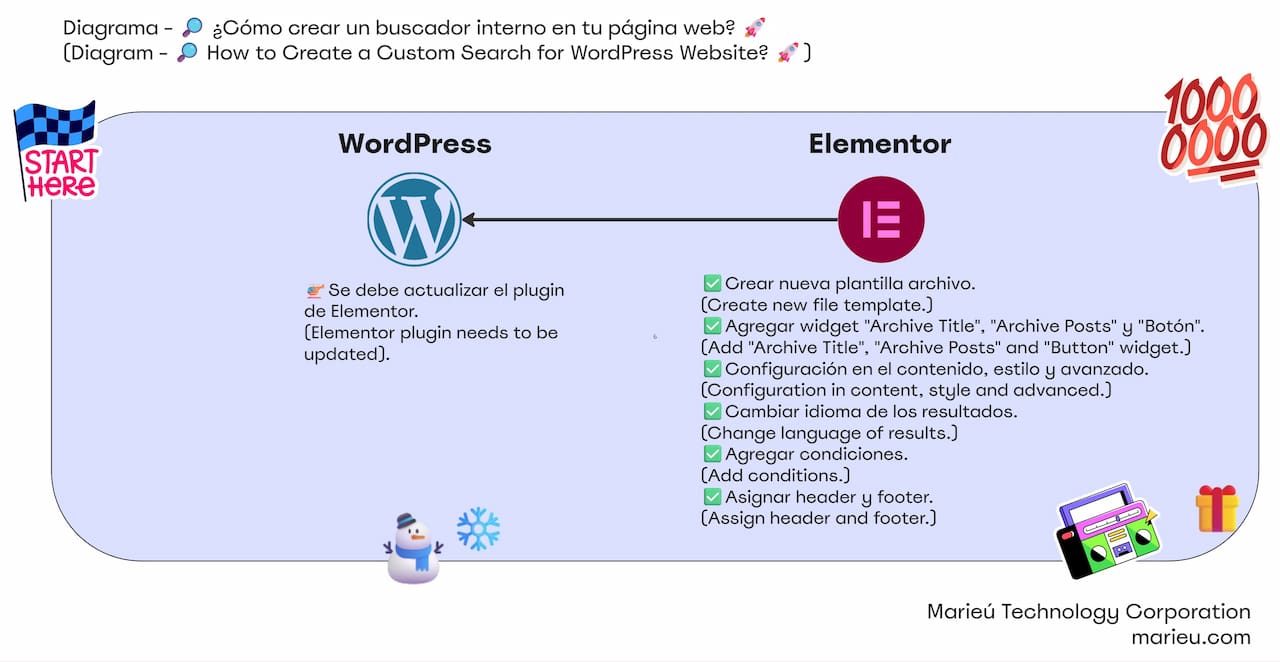
Diagram: How to Create a Custom Search for WordPress Site?
Source: Author’s Own Work.
Inside WordPress, we are going to go to Templates and create a new template. The template type, in this case, is “Archive.” For the template name, we will put “Search Engine,” then Create Template. If we have Elementor Pro, pre-configured templates are available. We will close the tab. We call the first widget “Archive Title”—there it is! The next widget is “Archive Post.” We select, drag, and drop.
By default, all the posts we have within WordPress are being added. Also, remember that we are going to add the Button widget, and we will add this in a new section. Additionally, we are going to add two spacers. We select, drag, and drop. We will use about 30 pixels. The same for the end; we will add a spacer here, setting it to about 30.
Within the “Archive Title” widget, we use XL size. We go to the second widget, “Archive Post.” Within the content, we are going to modify the style. Instead of “Classic,” we are going to set a “Card” style. We see that the layout has changed. We note a bit that the thumbnail image does not allow us to clearly read the text. For that, we are going to change the image size, set it to full, and reduce the radius a bit to 0.45. We eliminate “Comments” and only keep the “Date.” We have “Read More”; we can change it to “leer más.” Also, we will disable the “Avatar”—we hide it.
Regarding pagination, we want numbering to appear at the end. After Pagination, we will enter “Advanced.” This is the message, in case the post the user is looking for is not found: “We didn’t find what you were looking for,” and we are adding an emoji. How can we view this message? We go to “Settings,” and in “Settings,” we will change “Preview Settings” to “Search Results,” and click Apply. There we have it.
Now we go with the button. We go to “Content,” and we will put “Go Back.” The link or path must be a page where you find all your posts. In this case, we will link it to our Blog page. Inside our Blog page, we will center the button and place an icon at the end. We open the icon library, select a “Play” icon, after the text.
For the first widget, the “Archive Title,” we will leave the style as is, by default. The modifications will be regarding the second widget, which is “Archive Post.” Within the layout, we will leave it as is; we will focus on “Card.” So, for these corners, we are going to set a radius of 20 pixels. We go to “Image.” For each of the posts, we have the categories. These categories are indicated in the upper right. We select “Normal,” and for the background color, we will use a green color. For the text, white. Within “Image,” we will leave the other configurations by default.
We enter “Content.” This “Content” is to modify the text. We will change the color to a dark lilac color. We will set the “Secondary Color,” and for the “Meta” part, we will change it to a completely black color. We go with pagination. When it is in a normal state, we will set it to black. The spacing between the post and the enumeration will be 20. In “Hover” mode, we will set it to the “Secondary Color,” which is a darker lilac color, and for the “Active” case, a Primary Color. We leave the “Nothing Found Message” by default.
For the third widget, in style, we will leave it by default. For the three widgets, within Advanced, we will only make changes in Archive Post. As padding, we will set 35. We click “Settings.” How would the results window look? We click Apply, and currently, we have it like this: “los resultados de búsqueda para.” It will appear in English as “search result for,” so we can use the following trick. Appearance, we select “Theme File Editor.” Within the Theme Editor, we are going to look for the “Template Parts” section. We expand it and we will find search.php. Initially, it will appear in English; we translate it, click “Update File,” and check that it has been updated.
In our case, despite changing it here, within the Theme File Editor, it did not change; so, we had to go into the “File Manager.” We go to “File Manager,” access all the business web Hosting files, access our domain. In this case, we will enter “staging.” Inside “staging,” we are going to locate utils.php. We are going to look for a file called Core utils.php. If we only have the Elementor version, we enter here. We are going to change the text, which is the text in English, to Spanish.
Under Publish, we are going to set “Display Conditions.” We add the condition: it will be included whenever we have the “Search results,” and we click “Save and Close.” This guarantees the correct display of our custom search for wordpress.
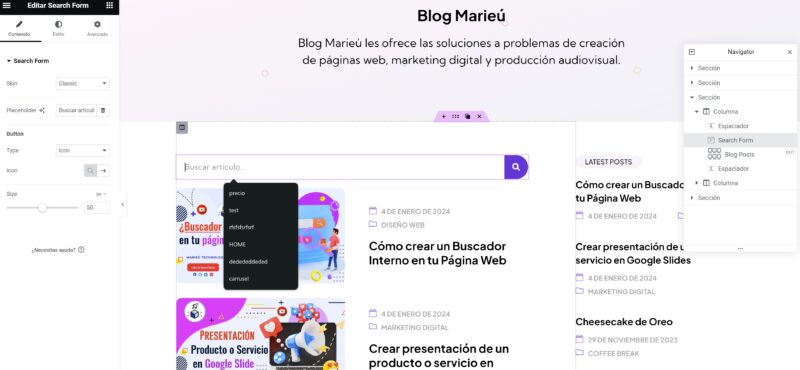
Marieú Technology Corporation Custom Search for WordPress.
Source: Author’s Own Work.
Final Results
It does not have a header and does not have a footer. To create the header and the footer, we go to Templates and “Theme Builder.” The following theme builder is enabled. Once we finish creating this header and this footer, we are going to add the conditions. We click “Edit Conditions.” We will include the condition that the header and the footer are displayed every time we access the Archive section. We put Include Archives, and in All Archives, “Save and Close.” This ensures a professional look for the Elementor Search Results.
“Elaborar Carrusel” (Create Carousel), we click Enter, and there it is! The Elementor Search Results already include both the header and the footer. We select the “Go Back” button, and we are back on the Blog page. That’s it, thank you, friends from Marieú Technology Corporation!

THE AUTHOR
Daniel Alejandro Montoya Godenzi
Alejandro, holding a Master’s degree in Administration and Project Management and a Mechatronics Engineer, has experience in digital technology projects. He is part of the Marieú Technology Corporation team. In his free time, he enjoys creating new projects, reading a book, or watching a series.





