
Hello friends at Marieú Technology Corporation, let’s talk about the Pop-up Window or MailerLite WordPress Popup! Indeed, in this step-by-step guide, you will learn how to add timing, color, texts, email fields, the subscribe button, social media links, a policy checklist, behavior, installation, and activation of a MailerLite WordPress Popup. 💥✅
MailerLite is an Email Marketing service platform. Some of the tools it provides are email campaigns, subscriber segmentation, integrated forms, and more. The installation of the registration form using the MailerLite plugin is done through WordPress, where you can integrate a form into your page and store subscribers.
How to Design a Pop-up Window or MailerLite WordPress Popup?
Internally within the MailerLite platform, we are going to create a new form, specifically a pop-up type. After that, we are going to edit the design and include some fields. For the WordPress side, we are going to install the MailerLite plugin.
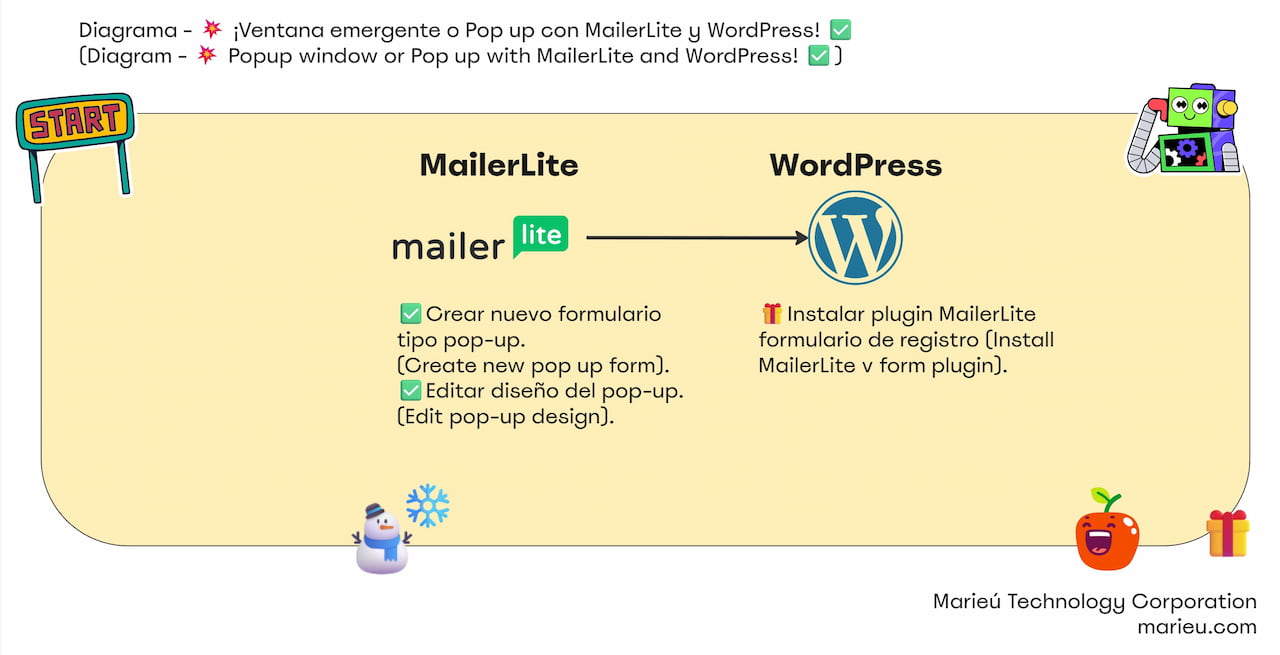
Diagram: MailerLite WordPress Popup or Pop-up Window!
Source: Author’s Own Work.
Once we have logged in, we have the option to add a form on the left side. In particular, we are going to create a Popup, assign a name: “Marieú Corp.” After that, we are going to select the form type. Whether it is a pop-up or emerging window, whether it is an embedded form within your website, or whether it is a promotional window. We are going to select the first option, click “Save and Continue.”
Here we can create a new group or select a group that we have already created to store all these subscribers. In particular, we are going to create a new one, “Marieú Corp. Popup Clients,” and click “Create,” then “Continue.”
We have a view of all the templates, or categorized by featured popups, full screen (if we want the entire screen), half screen (if we want it in the middle part), a modal, a slidebox, and others. We, in particular, are going to select “Featured Popup” and opt for the first one, “Mystery launch,” click “Choose.”
We have a section on the right hand, where the blocks that we can add to this MailerLite WordPress Popup are displayed. We have text, images, and social links. That’s for blocks; now let’s go with the design. Within the design, we can already see, in detail, the fonts, maybe make the width a little wider, and we can change the images.
We are going to start with a change of the background. For that, we select the background and change it. We select the Marieú image, click “Insert,” and here we see that it does not have an adequate width. For that, we click “Save” and we are going to reduce the “Width” a bit; we are going to assign about 580.
Regarding the time: days, hours, minutes, and seconds. “Expiration Dates” until January, Wednesday 10th. With that, the days increase, in this case, 35 days remaining.
We are going to go to “Settings,” where we can see the style. We are going to change the color, so here we paste the hexadecimal code; we already have a dark lilac color, click “Save.” After that, we are going to land on the texts. For the title, we are going to change from black to white. At the hexadecimal code level, all F’s, and click “Save.”
We are going to put “Launching Soon” for the title, and “Receive a notification when we launch” below. In the initial part, we are going to place a surprise emoji. If we want to change the subtitle here, we open and change the color to a light blue color. We reduce the size a bit; we are going to leave the font size at 16.
We are going to change the email field and the button. For that, we select the field and open the “Edit” option. In the right section, we can change the text here, email, click “Save Changes.” We are going to put “Subscribe.”
Now we are going to change the color. We go to “Settings,” paste the hexadecimal code that aligns closely with your website, and there we see the change—that is the “Hover” effect. We are going to change it and make it a little darker, so there we notice the change. The input border is missing; we see that there is a red border; we are also going to change it to dark purple. We go to Input, and here, in “Border,” dark lilac, click “Save.”
We are going to add a social links block. We are given the social icons; we paste the link of our social networks. So, there we have already assigned the three social networks. We are going to change the style or the color; in this case, we are going to put “White.” And finally, we are going to add a checklist.
We select “Sign Up Form Settings” and we are going to add a checkbox to confirm our privacy policy. For each of these, we are going to add a link. We select “Link” and insert our terms and conditions and policies page. We always open in a new window so that the popup is not affected, and click “Insert.” We put a light color and click “Save.” For the links, we go to Checkbox, we are going to change the color, we put white. “Done Editings” in the upper right corner.
What would be the behavior we want this pop-up window to have? Wait 5 seconds before showing the pop-up window; show it, perhaps, when we are scrolling our website to 50% or, if not, before closing the page. We are going to set it for when the user scrolls 50% on our website. The frequency with which the pop-up window will repeat for the same user: every month.
The schedule: perhaps we want the pop-up window to always appear from 3 to 6 in the afternoon. If we do not want a schedule and want it to be 24 hours, we put “None.” Regarding visibility, if we want it to apply to any of the slugs we have, we leave it as is; otherwise, we can set strict equality. It would only apply to the main page. “Save Changes.”
Remember that we can add this JavaScript snippet manually, by entering the task manager from our Hosting, or by adding the WordPress plugin. We are going to do it with the plugin. We are already inside WordPress. We are going to go to Plugins, add a new plugin: MailerLite Signup Forms. We go to MailerLite. Once activated, within Settings, we have to add the API Key and then activate the MailerLite Popups.
So, for the API Key integration, we go to Integrations. We are going to use the MailerLite API. We generate a new token, put the name, and a code will be generated. We are going to paste that generated code exactly here. We update it, and we would have the MailerLite WordPress Popup installed within WordPress.
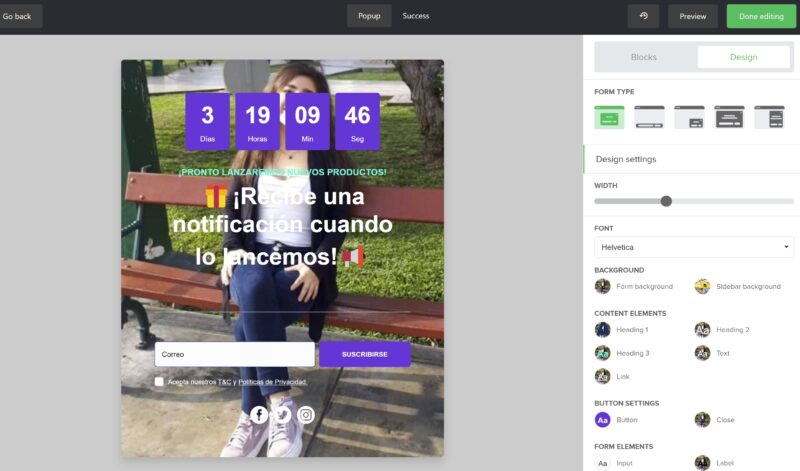
MailerLite WordPress Popup Design.
Source: Author’s Own Work.
Final Results
We are going to activate it; we set the status to “Activate.” So, here we are on the Marieú Corp. page. We scroll down, and the following window appears. We have the time we added. The user enters their email here and subscribes. Before subscribing, they must accept the “Terms and Conditions,” and the user’s data arrives in their email. This is how you implement a MailerLite WordPress Popup. Done, thanks friends at Marieú Technology Corporation!

THE AUTHOR
Daniel Alejandro Montoya Godenzi
Alejandro, holding a Master’s degree in Administration and Project Management and a Mechatronics Engineer, has experience in digital technology projects. He is part of the Marieú Technology Corporation team. In his free time, he enjoys creating new projects, reading a book, or watching a series.





