
Hello friends at Marieú Technology Corporation, let’s configure WP Mail SMTP! Indeed, in this guide, step-by-step, you will learn everything about how to choose the SMTP sending server, realize adjustments of the sending service, understand email features, and configure WP Mail SMTP settings for a test email diagnosis. 📧✅
WP Mail SMTP is an SMTP and PHP email plugin for WordPress. Among its advantages, it allows you to send and receive emails securely, provides email failure alerts, weekly email delivery summaries, integration with Google Gmail, Microsoft Outlook, etc. Its setup is simple and is done by installing the WP Mail SMTP plugin in WordPress.
How to install and configure WP Mail SMTP in WordPress with Hostinger?
Here is a small diagram for the secure email sending plugin. We will install the plugin for free in WordPress. If you want to get this plugin in the Pro version, we recommend you take our Web Optimization course, which we will leave in the description. Once activated, you will have two options within WP Mail SMTP.
The first option is to configure it with an open window, and the second, within WordPress. As for our Hosting, in this case, we are doing it with Hostinger, but it can be adapted for SiteGround, GoDaddy, Namecheap, among others, any of these web hosting services.
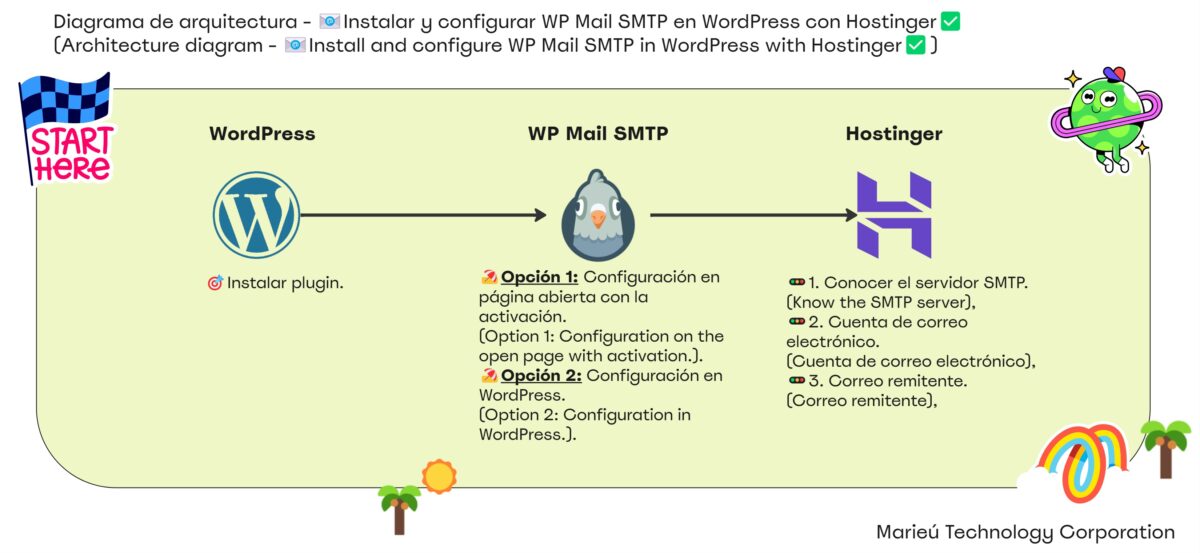
Diagram: Install and Configure WP Mail SMTP in WordPress with Hostinger!
Source: Author’s Own Work.
We are inside WordPress, we are going to go to Plugins, we have it here. We are going to add a new plugin and we are going to put WP Mail SMTP in the search, or remember, Simple Mail Transfer Protocol. Here, on the left side, we have the plugin, simply install it and activate it.
Once activated, the following window will appear by default: “Welcome to the WP Mail SMTP Setup Wizard.” In our case, we have already completed the steps, but we have taken some screenshots so that you can see, in detail, what our configuration was. We started with “Let’s Get Started,” then it will direct you to the next window: choose your SMTP sending server.
So, in the case of Hostinger, we have to select the last option, “Other SMTP.” In the case that we have hired a Workspace service, for example, from Google, we can use the Gmail account, select this option.
At the same time, if we have Outlook, we have it here, among other options. If we have an email registered within the Hostinger Mail service, select this option. Remember that the Hostinger plan also comes with corporate emails. So, we have configured it there, click “Save and Continue.”
What follows is the settings configuration. To successfully configure WP Mail SMTP for Hostinger, the setting is simply smtp.hostinger.com. After that, we are going to enter the encryption. We recommend, in this case, using TLS, since it uses more advanced encryption algorithms, and it is accepted within Gmail. What SMTP port are we going to use? For Hostinger, a port of 587 is recommended. Why? Because it is currently the most used and protects you against spam and malware.
After that, we have to enter the username and password. In this case, when you have the Hostinger email, that is the Hostinger email. Once you have created and have your account, simply place your email here, in what is the username, and the password, place it here, just as it is.
Next, we have the sender name. For example, here we have an order reception email within Marieú Corp., and the sender name, in this case, is the one here, the one that appears at the top. After that, also, since we do not want to create conflicts, perhaps with other mass mailing plugins, we are going to leave this option to “Force From Name” deactivated. If we force it, it could conflict with other plugins that we also use for mass mailings.
It also asks for the sender’s email address, in this case, where the email is coming from. For the same example, we have it here, this is the sender’s email, we have placed info@marieu.com. We force the sender email, in this case, if we want every message sent after a purchase or any customer notification to be sent from this email address: info@marieu.com. Finally, we can “Save and Continue.”
In addition, this WP Mail SMTP plugin offers us some features regarding sending. For example, we have “Enhanced Email Delivery,” which we are going to leave active, to reliably secure the sending. It also has “Error Tracking,” which easily locates errors, we are going to leave it active. As for the form and email logs, we are going to leave it deactivated. Why? Because in the first case, we do not use the WP Forms plugin; for the second, we do not want to store too much data within our WordPress, we simply want to send our emails securely.
Finally, “Instant Email Alerts,” which will send us an email in case the emails are not sent or there is some failure. Very good! So, after that, we can “Save and Continue.”
The option to start a diagnosis will appear, to run a test to see if it is working. We click “Start Diagnosis” and within the plugin, we enter WP Mail SMTP and we are going to go here, to Tools. It will direct you here to “Send a Test Email.” We put the email address in “Send to” to perform the test, select HTML format, and click “Send.”
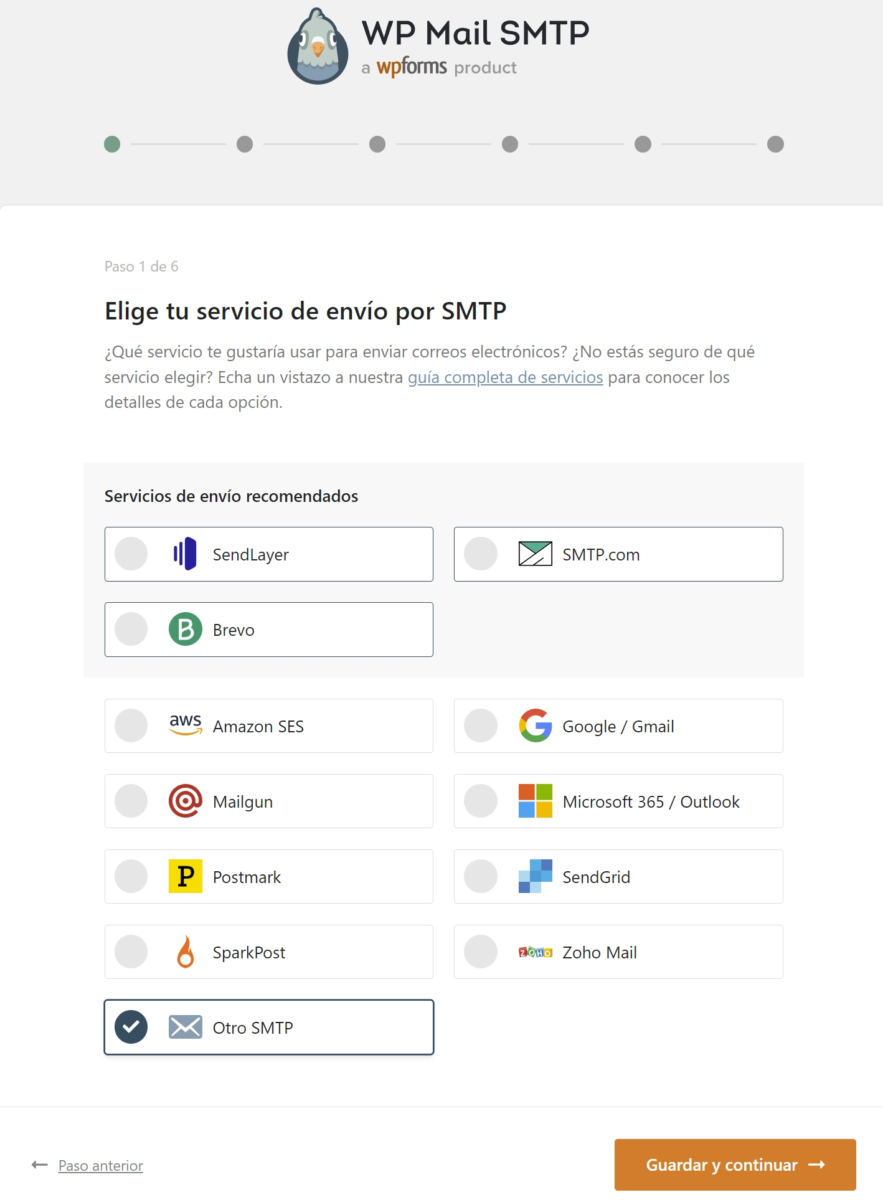
Choose Your SMTP Mail Service.
Source: Author’s Own Work.
Final Results
There it is, “Congratulations, the test email was sent successfully!” And, in fact, we no longer have any message about lack of encryption or security within the email. Remember that option one is the one we followed. Option two would be directly here in WordPress. We would have to enter the information here. Remember that we saw what the sender name is, and so on. We would have to do all that configuration here: configure WP Mail SMTP for Hostinger SMTP and the encryption. Done, thanks friends at Marieú Technology Corporation!

THE AUTHOR
Daniel Alejandro Montoya Godenzi
Alejandro, holding a Master’s degree in Administration and Project Management and a Mechatronics Engineer, has experience in digital technology projects. He is part of the Marieú Technology Corporation team. In his free time, he enjoys creating new projects, reading a book, or watching a series.





