
Hello friends from Marieú Technology Corporation, let’s create an incredible brochure design in indesign! Consequently, in this step-by-step guide, you will learn how to produce a booklet, trifold, or brochure in InDesign.
Adobe InDesign is a program for editing books, magazines, trifolds, brochures, and posters, developed by Adobe Systems. The company offers different plans, focused on businesses, personal use, or academia. Adobe InDesign is a program ideal for professional brochure design in indesign.
How to create an incredible brochure design in indesign?
So, for the first application, we are going to use Envato Elements, where we will get the template. We will look for one that can be opened with the Adobe InDesign application. Within Adobe InDesign, we will carry out a total of 6 steps. We will start by opening the .indd file, which is an Adobe InDesign file format.
Number 2, we are going to look for the template’s fonts. When we open the template within the application, a window will initially pop up, asking us to add the original fonts. Normally, in the file you download from Envato Elements, you get a .TXT file. If we open the .txt file, we have the direct link to download the font, which we will see in more detail there.
Number 3, we are going to edit the texts. This includes company messages, costs, contacts, external links, and more. Number 4, we insert company images. This includes logos, some icons, emojis, or some representative company images. We want to provide that view for the client through our brochure design in indesign.
Number 5, we are going to change the background color. For this step, it is highly recommended that we look for a template in the company’s color; if not, we can download one with another color and then modify the background color within InDesign. To do this, we change the background color using the Appearance/Fill option in InDesign. And finally, point number 6, we are going to export.
After we have done all this design within Adobe InDesign, we are going to export as Adobe/Interactive PDF. Why Interactive? To be able to use external links. So, we export as an Adobe/Interactive PDF, without compression, and in high resolution. The high resolution that InDesign offers reaches up to 300 pixels high by wide. Finally, we will use Creative Cloud Desktop to update the Adobe InDesign application.
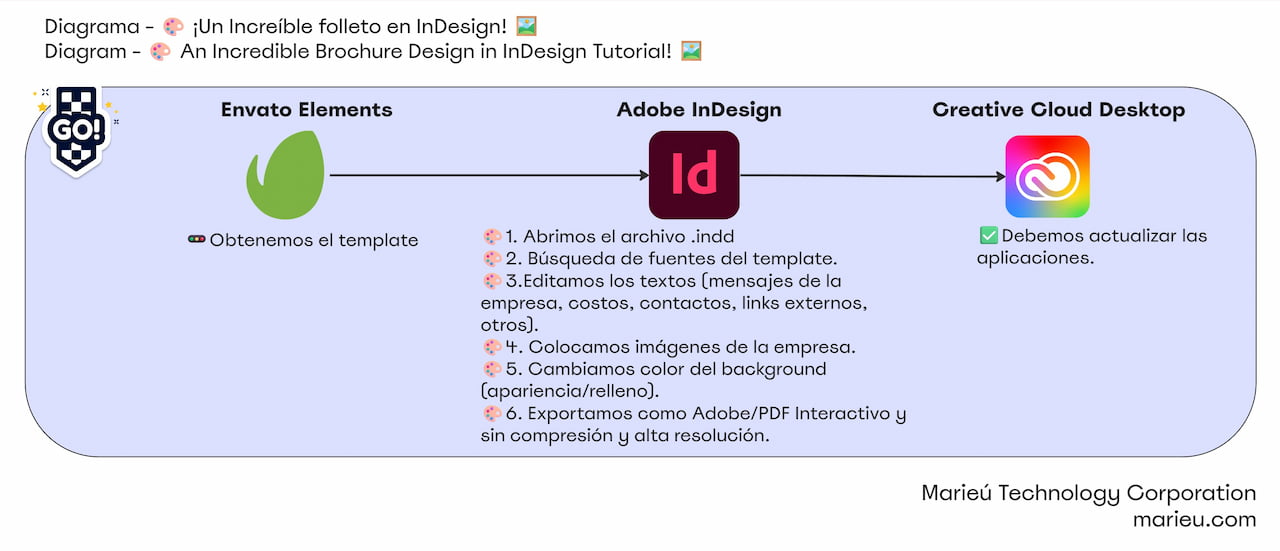
Diagram for Brochure Design in InDesign.
Source: Author’s Own Work, via Miro software.
So, in Envato Elements, we are going to “My Collections,” and we will enter here, Marieú Technology Corp. We will look for the “brochure” and go to page number 3. Within page number 3, here we have the trifold brochure or “brochure” that we are going to edit. Some features: compatible applications to open this “brochure” are Adobe Photoshop, Adobe Illustrator, and Adobe InDesign, to work on the edition.
Additional features: currently, we have the A4 format, it contains two pages, the three formats we initially saw, the three applications that can open the “brochure,” the dimensions, and the CMYK color model. What resolution? 300 pixels wide and high, among other characteristics. So, once we have downloaded it, here it is! We downloaded a highly aligned Trifold Brochure Template.
Initially, if you do not have the fonts, an alert window will appear, asking you to install the fonts so you can visualize the font type here. You can work with the font type of the template. In case you have to install an external font, it is recommended to install it through the Creative Cloud Desktop store. Here we enter “Fonts” and go to “Uploaded Fonts.” In Uploaded Fonts, we can “Add More” and add the famous .ttf files, which are font files.
Remember that the Adobe family also offers us fonts. Let’s see here. How do we access Adobe fonts? Adobe Fonts, we select the first one, log in, and there it is! We enter the name of the font. For the booklet, they are requesting the Poppins font. We search for Poppins, and there it is! We add it to the family, it connects with your Creative Cloud Desktop, and it simply activates—done. We update, and the InDesign application will update and allow you to edit it.
If the font is not found in Adobe Fonts, what we have to do is enter the file we downloaded. There is a .TXT file that says “Read Me.” We open it, and here it is! We copy the link of the Poppins font; it gives you the exact address. In this case, it is a reliable font because it is from Google. We copy and paste it here, there it is! We also have the Poppins font from Google. We download the font family—why the font family? Because it comes with everything; it comes with several styles, that is, it comes with Thin 100, Italic, Extra Light, among others.
So, once we have downloaded it, here it is, in a .ZIP file. We open it, and inside we have all the .TTF files, which are the fonts. We decompress it and upload it here, “Add More.” We load it, click “Done,” and it will finally synchronize with Adobe InDesign—super simple. Now, once you have added the fonts, we are going to move on to the texts. In texts, we do a quick review, and we have the “brochure” differentiated by pages.
Perhaps you want the initial presentation, which is the cover of the “brochure,” to start at the top, and the back part, which are the contacts, email, and location, at the end. So, we change it here. We select “all,” press the Shift key, release it, select the others, and drag to the end—there it is! So, we see that now we have the entry part of the “brochure” in the first row. For the second row, we have the contacts part. So here, we are going to go to the first column. This organizational step is key for successful brochure design in indesign.
So, we are going to make some changes. We review each of the sections, and to edit the text, we simply select it; we can edit it there. So, we have already added the texts. For this first column, we have added the title “Marieú Studies.” We have put three sections, where the first is “Web Inspection,” the second “Deep Optimization,” and the third “Analyze Growth.” For the second column, the title, in this case, is the company name and a small presentation of Marieú. We have also added an emoji. You simply select and paste an emoji—there it is!
If, perhaps, this font type is not recognized, we go to Properties. We select the emoji and go to Character. So, everything that is an emoji will always be found in the Noto Color Emoji SVG font family. We select it, and we will see several emojis that we can add. Further down, we have also added some messages and services for the client. For the last column, we have the plans. In this case, we have added a company service, and we are classifying it by three types of plans, which are web page development services.
Now we are going to go with the second face. It mostly includes contacts, external addresses—it could be your domain, among others. So, continuing with the text part of the other face of the “brochure,” we have the following: “We Create Your Website,” as our main company service. We have added two small reviews and “How to Optimize Your Web?” For the second column, we have used contacts. This QR came by default; now we are going to update it.
We have also added the phone number, tax ID, location, and email. These are the email addresses, and this is the website. Finally, for this last column, we have added a characteristic phrase of the Marieú company. We have placed a vertical title “Marieú Brochure.” And it concludes with a small contact phrase, within the contact page, and the external link of the website. This detailed planning is essential for a high-quality Trifold Brochure Template.
So guys, now we are going to move on to images. Where are we going to place the images? Here we have a space to insert an image. We are going to analyze which sections require an image. We can add an image here, in the messages and services. We can add an email emoji. Here in Services, perhaps a “World” emoji, or we can also add a company image here! And, for the “We Create Website” section, we can perhaps add a 3D emoji—let’s see it.
So, for the first case, if we want to add an image, we select the image area, go to File, and select the Place option. You can also do it with “Control” plus “T.” Here we have the images. We are going to select here, there it is! For us to scale correctly within the frame, we are going to do the following. We go to “Frame Fitting,” and within “Frame Fitting,” we are going to select “Fit Content Proportionally.” If we select it, there it is! The same with the next ones.
So, there it is! Look, we have already placed the image here. Furthermore, in the second column, we have also placed an image of Marieú. For messages and services, we have placed the emojis. And, for the third column, we have placed a 3D image for each of the plans, differentiating each of the plans with a 3D image. Now for the second face of the “brochure,” we have integrated the 3D emoji—there is the 3D emoji!—and also a representative image here of the company’s teamwork.
Now what we are going to do is change the background color and align it much more to the company’s color. In this case, we initially downloaded a template highly aligned with Marieú’s company colors.
If we want to make a change to the background, we select one, and we can make the change here, in Fill. We select Fill and change it. There it is! If, perhaps, the characteristic color of the company is light blue, we change it. Maybe it’s green, and so on; we can keep varying the colors, okay? In our case, we will leave it by default.
Now, if we want to include hyperlinks, we have to change the appearance of InDesign. We are going to change it to “Digital Publishing” mode. Now in Digital Publishing, we are going to open a small panel here, and we are going to focus on Hyperlinks. We select here, the emoji is already selected. Once here, we are going to focus on buttons and forms. For that, for it to be enabled, we have to select the emoji, and it enables—there it is! We have previously included the redirection to an email, to the email, in this case, of marieu@marieu.com.
So, in your case, you would have to include them. We put “Button Type,” we select the first option, enter the name. In this case, it is a message button, and you are going to select the event. When will the event be activated? When the user enters and clicks on this emoji. What event will be activated? It will redirect to send an email to marieu@marieu.com. For this URL to work, you have to include mailto: followed by the company’s email, which is the email for receiving inquiries—there it is! Generating a QR code is a final interactive step for your brochure design in indesign.
For the world emoji, it will also redirect to the company’s URL. It is a “World” button. We have other external links. For the second face, email—there it is! For example, we select the company’s external address, and we are going to open Hyperlinks. And this is where you will put the URL address. When they are hyperlinks, compared to buttons, it is much simpler. It is enough just to put the URL.
Finally, for the QR code, we click “Right Click” and we are going to select “Generate QR Code.” A window to generate the QR code opens up for us. We select “Web Hyperlink” type, and here we are going to place the URL. We are going to place the company’s URL. We copy and paste it here, click “OK,” and there it is! Then, we do the following: copy, “Ctrl” plus “C” and “Ctrl” plus “V,” and there it is!
Once we have the QR, we are going to reduce the dimensions a little and set it to 50—there it is! Remember to double-click; otherwise, it will move within that frame, which is not the intention. So, double-click. Now it has moved with everything—35, and there it is!

Marieú Technology Corporation Brochure Design in InDesign.
Source: Author’s Own Work, via Adobe InDesign.
Final Results
Final Results Finally, we are going to export. Now we go to File, Export, and we are going to leave it as Interactive. In some cases, by default, it appears as Print. In our case, for the external link to work, we are going to select Interactive, click Save. For all the sections, all the columns of the “brochure” to come out, we are going to select “Spreads,” so that the three columns and two pages come out, all within the PDF, in PDF format. We click “OK,” click “OK.”
Remember that the brochure, in this case, is in CMYK color mode. RGB is not highly recommended because we are not showing an illustration or a web design; rather, we are showing a Trifold Brochure Template where the client will simply be informed about everything concerning the company. Ensuring CMYK color mode is vital when exporting your Trifold Brochure Template. So, here we are going to open the final version of the “brochure,” and there it is! Let’s test some links, for example, here, and there it is! It redirects you to the company’s website, services. Done, thank you, friends from Marieú Technology Corporation!

THE AUTHOR
Daniel Alejandro Montoya Godenzi
Alejandro, holding a Master’s degree in Administration and Project Management and a Mechatronics Engineer, has experience in digital technology projects. He is part of the Marieú Technology Corporation team. In his free time, he enjoys creating new projects, reading a book, or watching a series.





