
Hello friends at Marieú Technology Corporation, are you looking for the best chat plugin for WordPress? Indeed, in this step-by-step guide, you will learn everything about how to create a Crisp account, install it in WordPress, configure the language for the chatbox plugin, add additional users, install the Crisp Live Chat application, and manage account settings. 🏅🎯
Crisp is a platform for managing and interacting with customers. For this, it offers its Crisp – Live Chat and Chatbot plugin, which can be implemented within WordPress, Shopify, Webflow, etc. Among some advantages, the chat integration can be installed via plugin or HTML code, and you can also integrate Crisp Live Chat with Slack, your emails, Messenger, Twitter, Telegram, Whatsapp, and SMS.
What Is the Best Chat Plugin for WordPress?
We are going to start inside Crisp, which also serves as a chatbot plugin in WordPress. We have to create an account on their official page, where they will require some important fields such as: name, email, website, business name, and others. After that, we have to configure the control panel. For the WordPress side, we have two options to install Crisp Live Chat. The first is via a plugin, and the second is via HTML code.

Diagram: The Best Chat Plugin for WordPress?
Source: Author’s Own Work.
We are going to search for “Crisp chat,” enter the first page, and here we have the option to create a free account. We start with names, surnames, email, and a password, which we have ready. In step number two, you will see “Install Crisp on your website.” It will ask for the name of your company or business and, finally, the link to your website. In both cases, we complete the fields and click “Continue.”
After that, it will give us the HTML code to place in the header. For this, they give us several options, in the case of web development platforms such as WordPress, Wix, Shopify, among others.
We are already inside WordPress. We are going to choose to place the HTML code within our website. For that, we use the Elementor builder. You can do it with another, it can be Divi, Astra, Ocean, among others. Within Elementor, we are going to go to Custom Code, and here, we are going to create a new one. Previously, we have already created it, but we are going to do it again. We add and put “Crisp” as the title.
For the code, that is where we have to paste the code that the Crisp page has provided us, there it is! We copy it and paste it here. Once we have pasted it, we are going to put the location: inside the Head, we put a priority of “one.” We are going to add some conditions, click “Edit” here. If we want this chat to appear within the prices page, we click “Add Condition,” on a “singular” page, as long as it is within the following page: we put “Prices” and add it.
We can add it to a contact page, services, among others. Once there, click “Save and Close.” Remember to click “Update” so that the changes can be visualized, and we are going to go to the control panel.
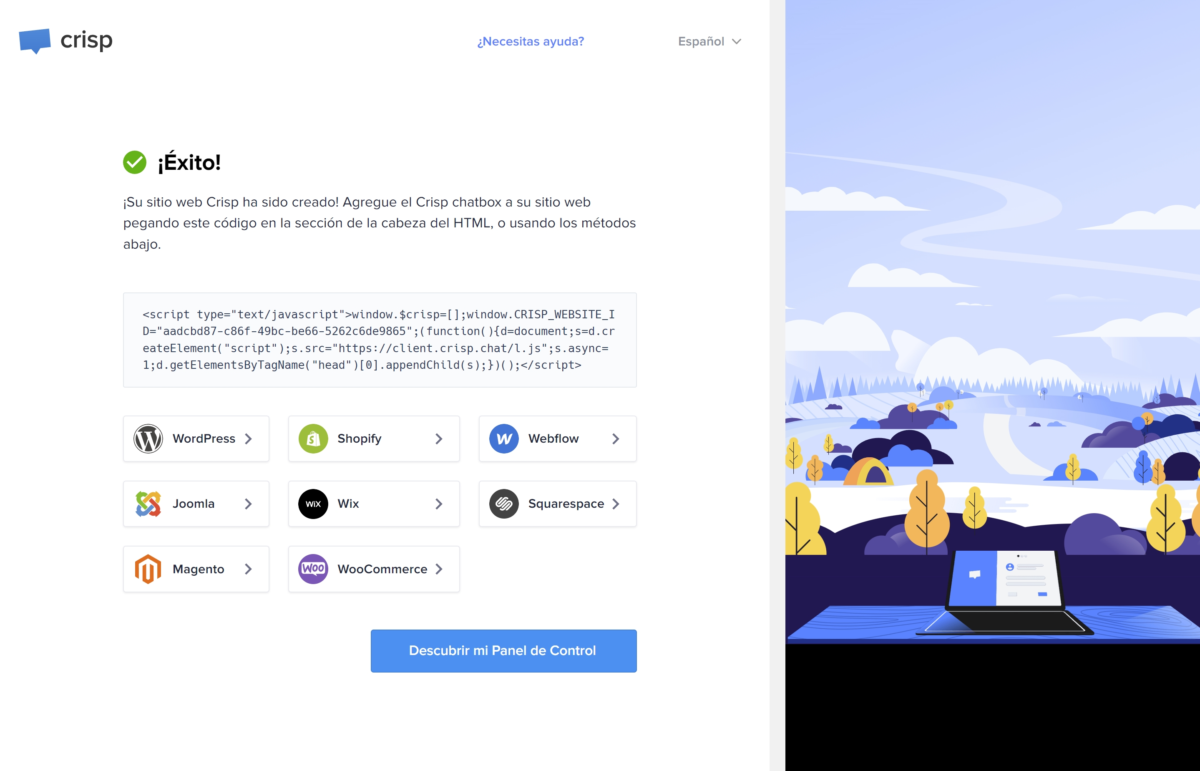
HTML Code to Install Crisp Live Chat.
Source: Author’s Own Work.
Initially, you get a message from the Crisp Team, welcoming you and giving you some tutorials so you can configure it. A very important configuration that we are going to do within the control panel is to change the language. We go to “Settings,” “Website Settings.” Within that, we are going to configure it. Internally, to find the language setting, we are going to go to “Chatbox Settings” and go to “Appearance.” Within that, here we have the language.
In this case, we have selected to detect by country; that is, if someone connects from the United States, the chatbox would change to the English language. In case you want a particular language, we have all the languages here, select it, and it has an automatic save. Since we have included it within the prices page, we go there, and here is the Crisp Live Chat, there it is! Previously, some tests have been carried out, okay. We see that it is detecting the language, in this case, Spanish.
Another very important piece of information within this control panel is the fact of adding many more users who can control all these messages that come from the customer. So, for that, we go to “Settings,” “Operators in the Team,” and here we can add many more collaborators. We can add an “Operator,” and here we can place the “Member” role or the “Owner” role.
Basically, the difference is that a Member is a collaborator, in this case, of the company, and the Owner is primarily the proprietor. We enter their email, and they will receive a notification of the invitation to the Crisp Live Chat control panel. How would these roles look within the chat? In the following way, there it is! So, we already have the three roles. Any of these collaborators who responds to the customer would already be taking the main role of their service.
Another important piece of information so that we can control these chats that come from the customer is to have the Crisp application. We are going to select the Crisp download page, and here we have all the variety of applications: Android, iPhone, Windows, Mac, among others. We have already installed it for our Android device, and it is very good; you can answer customer queries using the best chat plugin for WordPress.
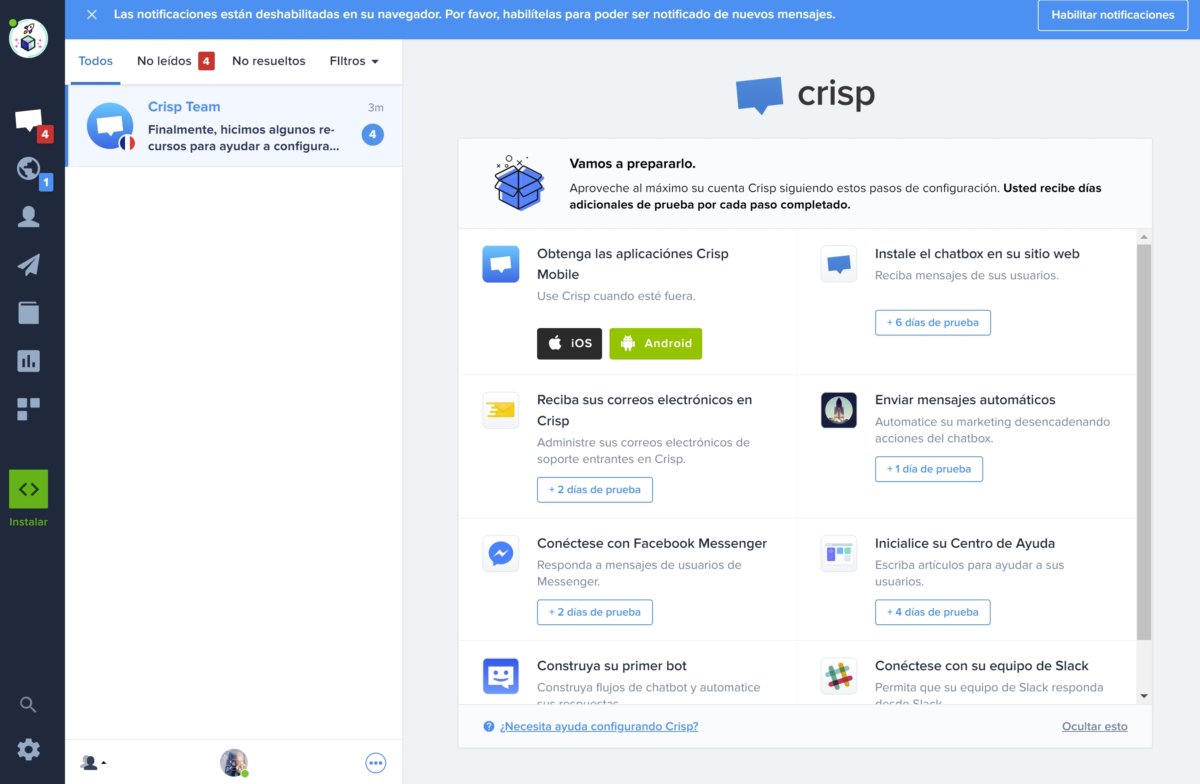
Crisp Live Chat Control Panel.
Source: Author’s Own Work.
Final Results
Finally, if we want to make a configuration of the control panel, perhaps at the profile level, we go here, to the profile photo, and click “Manage Account.” So, here, perhaps some final changes, such as changing the language, placing an Avatar, among other options. Remember that Crisp Live Chat is the best chat plugin for WordPress for a reason! Done, thanks friends at Marieú Technology Corporation!

THE AUTHOR
Daniel Alejandro Montoya Godenzi
Alejandro, holding a Master’s degree in Administration and Project Management and a Mechatronics Engineer, has experience in digital technology projects. He is part of the Marieú Technology Corporation team. In his free time, he enjoys creating new projects, reading a book, or watching a series.





