
Hello friends at Marieú Technology Corporation, how to create an animated product presentation? Indeed, in this step-by-step guide, you will learn how to create a project, install fonts, import a local template, import images, edit text, edit images, and export in Adobe Premiere. ▶️🕹️
Adobe Premiere is a video editing program, developed by the company Adobe Systems. Among some benefits, it has compatibility with other applications, allows you to apply audio effects, transitions, video effects, among others. The Adobe company offers different plans, focused on businesses, personal, or academic use.
How to create an Animated Product Presentation?
We will use Envato Elements for the template. After that, we are going to edit it inside Premiere. Before creating a sequence and using it within the Premiere timeline, we are going to import an image and, subsequently, we are going to insert the template, to edit the animated product presentation. Finally, we are going to export this presentation. In the case of Creative Cloud Desktop, we are going to create some fonts, and we need to update the Adobe Premiere application.
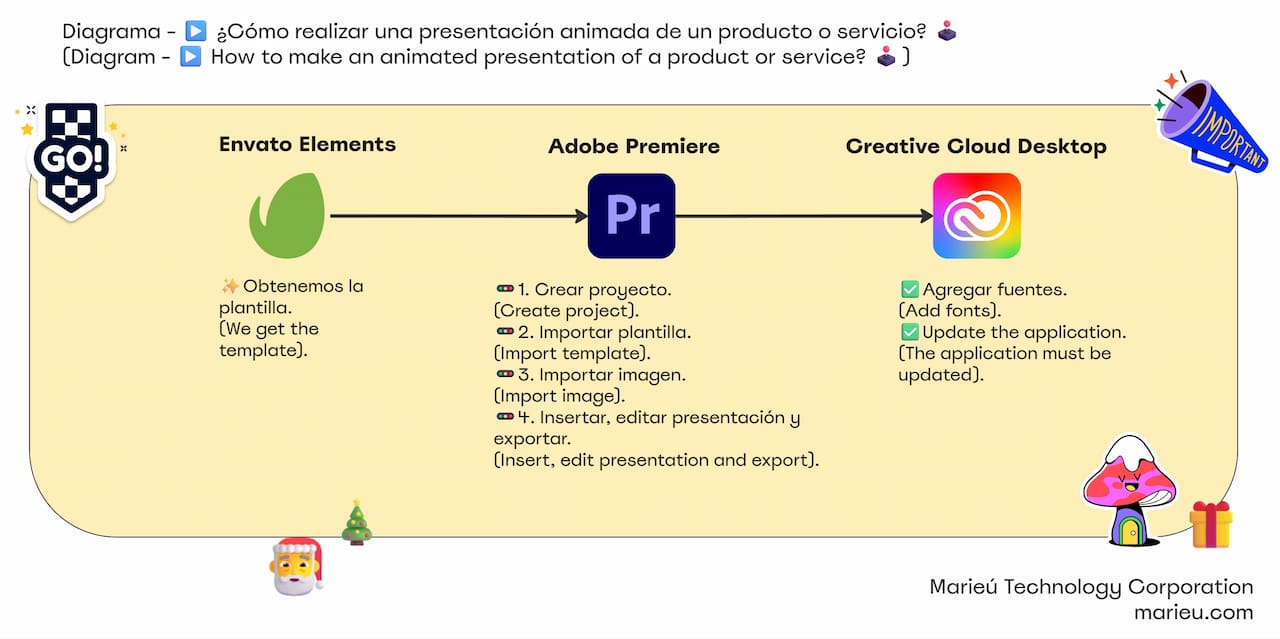
Diagram: How to Create an Animated Product Presentation?
Source: Author’s Own Work.
So, here we have the presentation. It is a slide-type presentation, where we will be able to edit it with Adobe Premiere. There are several sequences, a total of 1 minute and 21 seconds. We have things to modify like text, images, some reference videos, all of which we will do within Adobe Premiere. We are going to go to download, click download, and internally, if we open the folder, we will have the .MOGRT file and a .PDF help file.
Where do we find the fonts? Inside this PDF help file. In particular, the font type would be Poppins. We download the family, “download family.” Inside this font file, we have the entire Poppins font family.
To install it within Creative Cloud Desktop, we go to Fonts and click “Uploaded Fonts”, “Add More”, drag and drop. Check the box for the necessary rights and licenses when uploading the font and click “Add”. In some cases, Adobe Fonts already has that font. Let’s go to Adobe Fonts, search Poppins, we have already added it, there it is.
We are inside Adobe Premiere, we are going to create a new project. Remember to name it “Marieú Animated Presentation”. We change the project location, click “Choose Location” and we are going to save it in introductory videos, select “Create”.
Now, what we are going to do is import the template that we downloaded from Envato Elements. For that, we go to Essential Graphics, we have it here, and internally we are going to select “Local Templates”. We are going to add an additional folder. Inside this folder we have the animated product presentation file, select the folder, and done.
So, we expand Local Templates and we are going to look for our imported folder. Remember the folder was called “Dental Clinic Center”, select it, we are going to close it, and done. So, there we have the presentation. In the case that you get an alert about a missing font, you can follow the same previous procedure: download the font and install it within Adobe Creative Cloud.
Now we are going to import an image, to create the sequence. We select the project panel and import the image. To import the images, we are also going to do it within Envato Elements. We open the image, simply download each of the images. Select, drag to the timeline panel, there it is. Now we are going to insert the presentation. We select the presentation, drag and drop, and done. So, now we can delete the image and only keep the presentation.
A recommendation here: first, we go to Sequence and we are going to generate “Sequence Settings”. Remember that the original sequence is the size of the image; we have to change it. What would be the appropriate frame size for a presentation? 1920 by 1080. And, we are also going to change QuickTime, since it is an iOS system format. We are going to change it to a Windows system, which is recommended so that we do not have some delays within this timeline panel. We select I-Frame Only MPEG and click “OK”.
The preview format will be eliminated, and we will keep the new sequence, click OK, and there it is. Another recommendation we make here is to lower the playback resolution a bit, that is, if we initially have it at Full, we can lower it to the Quarter part, with the aim of not consuming too many resources.
We also recommend processing the entire presentation before starting to edit the texts and include some images. We select the presentation and, on the right, within Essential Graphics, we go to Edit. We have all the configuration that we are going to carry out for the animated product presentation.
We are going to start with the intro. We are going to leave the colors by default, and we are going to change the intro text. We are going to put here, “Your Teeth…”, in quotation marks. We notice the update there. For the intro number two, we are going to put “Center…” and click outside. That’s for the first few seconds. We see there, as the video progresses, we have those texts that we are going to show the client.
Then, we have this presentation. For that, we are going to change the image. We select the three lines, “Replace from Explorer”, select the image, and there it is. In case it is perhaps too scaled, we can reduce the size a little, from 15% to 10%, there it is! In our case, we are going to leave it at 15%. We have an image 2, in particular, it is in this section, similar to image number one, and here we select the first image. Done, so we are going to put “center”, check the change, there it is.
Let’s go with the small text, now for slide 1.2, it is a “little” more technical. We are putting “Specialists in Pediatric Dentistry, Dental Aesthetics, Oral Rehabilitation, and much more”. We check the presentation, click outside, and there it is! In fact, we can insert a line break so that it does not overlap with the image. Within “Oral Rehabilitation”, we insert a break and done! There it is.
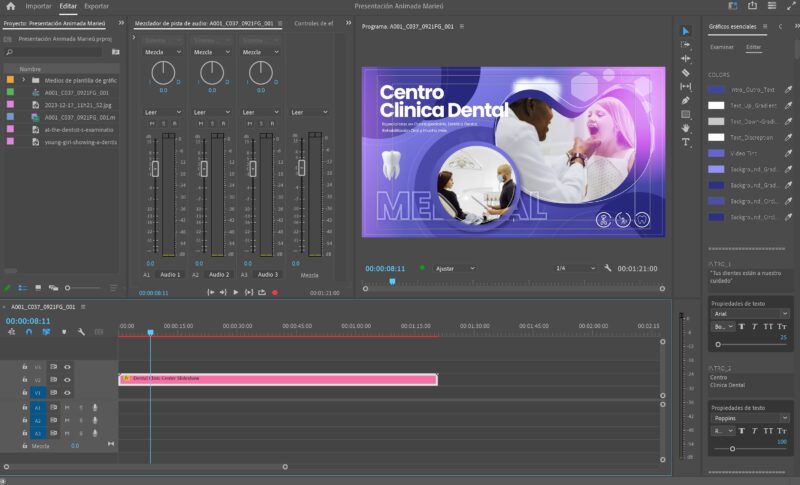
Animated Product Presentation in Adobe Premiere.
Source: Author’s Own Work.
Final Results
Final Results: Finally, once we have finished the presentation, we are going to export. We select the location of the file to be exported, location, click Save. Regarding the time, we are going to set a custom time. Remember that we have it ready until the ninth second, that is, up to here. We close the brackets, and we already have a custom range, which will go up to the ninth minute, select Export, and done.
So, finally, we already have the following results. Remember that we changed the text, included some images, as well as the characteristics of the service, there it is. This is the result of creating an animated product presentation effectively. Done, thanks friends at Marieú Technology Corporation!

THE AUTHOR
Daniel Alejandro Montoya Godenzi
Alejandro, holding a Master’s degree in Administration and Project Management and a Mechatronics Engineer, has experience in digital technology projects. He is part of the Marieú Technology Corporation team. In his free time, he enjoys creating new projects, reading a book, or watching a series.





