
Hello friends from Marieú Technology Corporation, let’s make an adobe premiere product presentation! Indeed, in this step-by-step guide, you will learn to import an image or video, change sequence settings, edit video, images, texts, and export in Adobe Premiere Editing. ▶️🎁
Adobe Premiere is a video editing software developed by Adobe Systems. Among some of its benefits is compatibility with other applications; it allows you to apply audio effects, transitions, effects, and more. The Adobe company offers different plans, focused on businesses, personal use, or academic use. It is the ideal tool for creating a professional adobe premiere product presentation.
How to Create an Adobe Premiere Product Presentation?
We will use three applications. We start with Envato Elements, where we will get the presentation. We use Adobe Premiere, in which we will create the project, import the presentation we downloaded from Envato Elements, and import an image or a video. We will insert an image into the timeline to create a standard sequence. After that, we delete the image, and we will cut the presentation.
Finally, we will edit the adobe premiere product presentation, place an image, edit the texts, and export. This presentation comes with two fonts that we must download and install using the Creative Cloud Desktop application. And we must update the Adobe Premiere application.
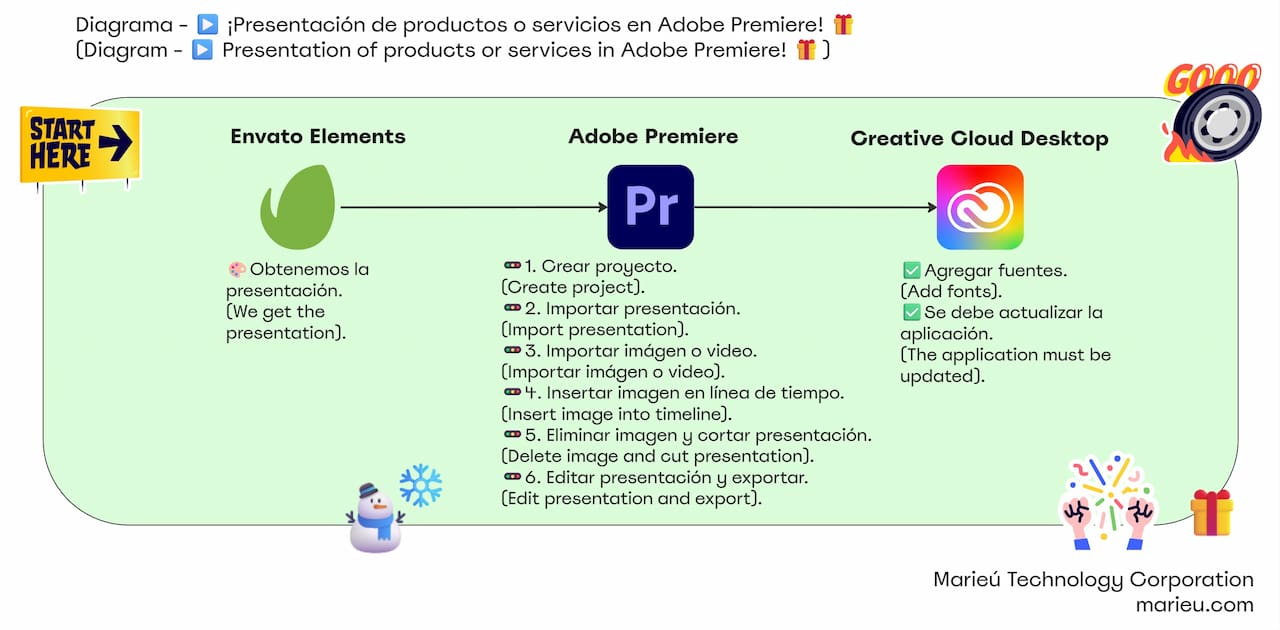
Diagram: Adobe Premiere Product Presentation Guide!
Source: Author’s Own Work.
We are inside Envato Elements; we have the presentation of the products or services. For example, there is the presentation of three products, and we can include their prices. It is a Mogrt-compatible file, which we can enable within Adobe Premiere, which is essential for your final adobe premiere product presentation; it has a resolution of 1920 by 1080.
Let’s download it. We will create a new project for our adobe premiere product presentation within Adobe Premiere. Click New, we will assign a name, “Marieú Services Presentation.” We will change the location of this file and click “Choose Location.” We select the folder, and click “Create Project.” When we download the template, it will come in .ZIP format.
We decompress it, open the folder, and inside we have the .MOGRT file. We must also include the fonts; it comes with a .txt file listing two fonts. On one side, we have the Travel Soulmates font, and on the other, we have the Montserrat font.
So, before importing the footage and images, we have to install the fonts. Here we have the first font; we copy the link and go to the dafont.com page. We decompress it, and there we have all the .otf or .ttf files; both files are fonts. We open the Creative Cloud Desktop and go to the fonts. Within the fonts, we will select “Uploaded Fonts,” and we can “Add More.” We have a total of two; they are the same, just in different formats. We will select the first one, the .TTF file, drag and drop it. We check the box for rights and licenses, and click “Add Font,” the Futura font is installed.
Once here, we will add the .MOGRT files in the following way. We go to Essential Graphics. In some cases, if it doesn’t appear, you can enable it here: Window and select “Essential Graphics.” We will click on “Manage Additional Folders,” click Add. We locate the folder we downloaded.
Remember, it is a folder where all the .MOGRT files are located. We select the folder, click “OK,” select the local checklist, and here, Merry Christmas—there it is! In case the font is not configured correctly, an alert will appear in the upper right corner. You have to check again, and if possible, install the other font type, the .OTF file.
We start by importing images. We are going to add the 3D email signature icon, drag and drop it. Here we have the 3D icon; drag and drop it onto the timeline. We will go to Sequence to modify the settings. Within these sequence settings for the adobe premiere product presentation, we are going to set the frame size to 1920 by 1080.
Regarding the preview file format, we will change the QuickTime format because this format is from an iOS system. We will change it to i-Frame only MPEG and click “OK.” An alert will appear about changing the preview file format, which affects the frame size for video editing. We click “OK,” and with that, we would have a Full HD resolution.
Drag and drop the presentation; we are placing it on track number two. In this case, it is recommended to divide it into sections. Remember, then we deleted the image and cut the presentation. Now we are going to edit the presentation. If we look inside the fifth scene, we are going to include the image and edit the text.
We go to Essential Graphics and click “Edit.” Inside Edit, we go to the fifth scene, and here, we have all the texts included in that scene. We will place an image related to the service we are offering, click Replace. By the way, you can also find that image in Envato Elements. Depending on the image, we can vary the scale; we will leave it at 21, and we will edit the texts. We go here, Text, “The Best Christmas Gift.” We wait a bit for it to update, and there we have it.
We will place the service here, “Website.” For the label part, we will put the price. Remember that we are offering the basic plan for $31.99.
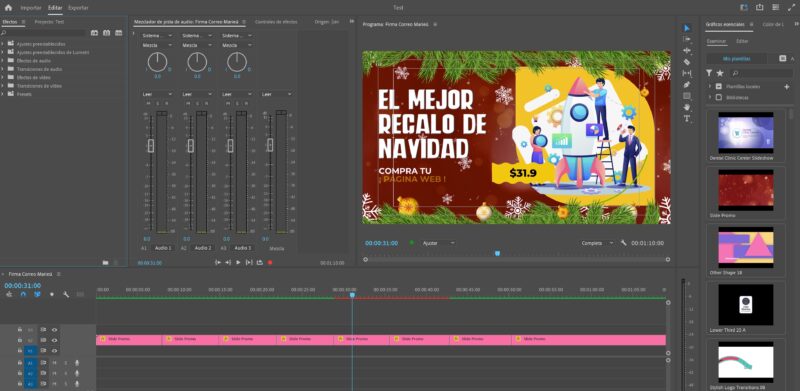
Editing Christmas Products/Services in Adobe Premiere.
Source: Author’s Own Work.
Final Results
We only want to export scene number 5 of our adobe premiere product presentation; for that we have to calculate the time. Approximately, it starts at minute 28 with 43 seconds and ends at minute 35 with 37. We are going to export, and here, we are going to select a custom export range. We start within minute 35 approximately, open brackets, and we will export until minute 35, close.
Finally, click export. The best Christmas gift, buy your website, and on the right, you have the price. That’s it, thank you, friends from Marieú Technology Corporation!

THE AUTHOR
Daniel Alejandro Montoya Godenzi
Alejandro, holding a Master’s degree in Administration and Project Management and a Mechatronics Engineer, has experience in digital technology projects. He is part of the Marieú Technology Corporation team. In his free time, he enjoys creating new projects, reading a book, or watching a series.





