
Hello friends at Marieú Technology Corporation, let’s talk about the 70 best cinematic LUTs in Adobe Premiere Pro for your videos! Indeed, in this step-by-step guide, you will learn to download the LUT template from Envato Elements, create a project, insert videos, import LUTs, color grade in Premiere, and export videos. 🎁🏅
Adobe Premiere is a video editing program, developed by the Adobe Systems company. Among some benefits, it has compatibility with other applications, allows you to apply audio effects, transitions, video effects, and more. The Adobe company offers different plans, focused on businesses, personal, or academic use.
What Are the Best Professional LUTs in Adobe Premiere Pro?
Before applying this Lumetri color effect in Adobe Premiere Pro, we have a small diagram of how we will be able to obtain these 70 LUTs and install them within our videos. We are going to start with Envato Elements; internally, we will look for the template that contains the 70 LUTs. After that, we will enter Adobe Premiere and create a project. Once there, we will insert some videos we have to include these LUTs. Finally, once we have imported the folder of the 70 LUTs, we will be able to export the already edited video. The entire process is a form of Color Grading.
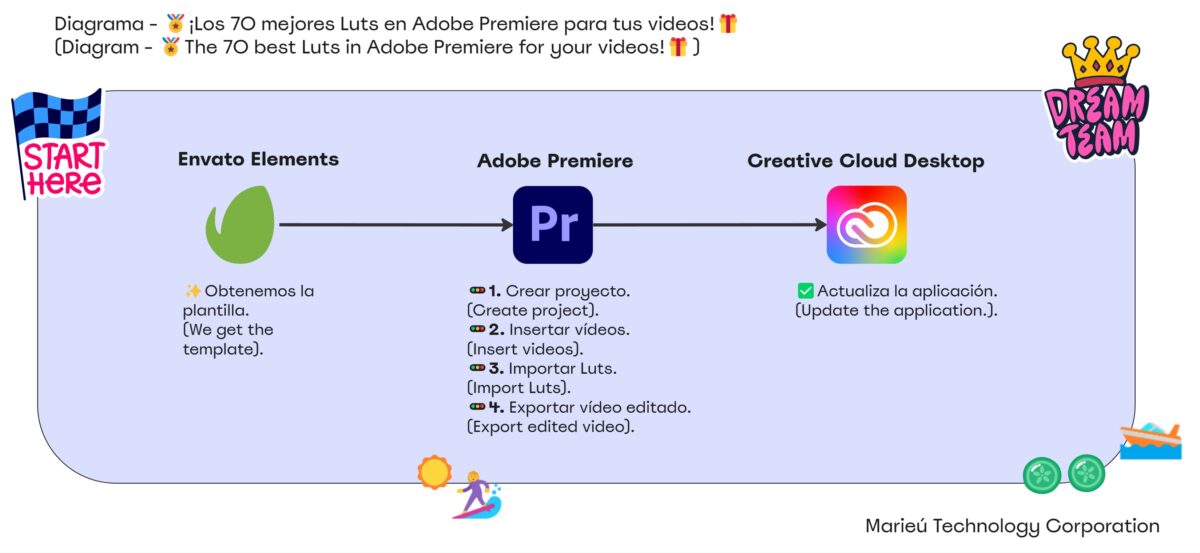
Diagram: The 70 Best LUTs in Adobe Premiere Pro!
Source: Author’s Own Work.
Inside Envato Elements, here we have the LUTs. A total of 70 varied LUTs come, and we can apply them to any of our videos; there it is. For each of the scenes, we see what the before and after looks like. Now, if we want to download it to install it in Adobe Premiere Pro afterward, we have to select it here, click “Download.”
We are already inside Adobe Premiere. We are going to create a new project. For that, we go here and click “New Project.” Now, we are going to assign a name; we are going to put “Marieú Corp. LUTs.” We are also going to change the project location. For that, we click here, project location, and choose the location. We are going to save it here, select the folder, and then click “Create.”
Here we already have our project open. What we are going to do next is insert the videos we have. The video we are going to insert is here; we are also extracting it from Envato Elements. Once we have downloaded it in this section, we will insert it into the project panel. So, we have the “Fast Students” video here. We select it, drag, and drop. Once there, we zoom in; we are going to move it into the timeline, there it is!
Perhaps we have or want another aspect in terms of sections; we can simply change it here. And, there we have the workspaces. We, for example, have created one in particular, and based on that, we work on each of our edits. The video is already there, running.
Now, we are going to apply the LUTs. For that, we activate the Lumetri Color tab. For that, here, within the window, we must have “Lumetri Color” activated. We select it, and we will already be able to visualize this tab. Once there, we select, click “Edit.” There is a basic correction section, creative, curves; we are going to focus on the “Creative” section, given that it is much simpler for us to see a thumbnail, based on this “look” we are selecting. For example, we deploy here and click “Browse.”
When we download the LUTs ZIP from Envato Element, we have it here. We are going to unzip it, click “Extract to Cinematic Loot.” It comes with a macOS folder, which is for the macOS system. The second and third folders can be used within our Windows system. Internally, within “Generic,” we have several LUT files, which we can identify by the file name followed by “.cube.” This is how you find the best Luts in Adobe Premiere Pro.
So, once here, remember that we already know the location of the LUTs, we are going to click “Browse” under “Look”, and here we have the folder with all the best LUTs in Adobe Premiere Pro. There it is. We click “Open,” and it would already be applied.
For us to notice the difference in the LUT, we are going to do the following: we copy the video and paste it again. We are going to place it on a second track, and what we are going to do is apply the LUT and align them. We cut, more or less at the two-second mark, and delete. We are going to apply a small video transition. We go to this folder, video transitions, and put “Dissolve.” Inside “Dissolve,” we find “Film Dissolve.” We select it and drag. We are going to place it exactly here, before starting with the duplicated second video.
We are going to apply the LUT on the second track. So, here we select the LUT. Remember there were two, one that is “Generic” and another that is “Standard.” We are going to put a “Generic” number two. We start playing from an initial stage, rewind the playback time a bit, click “Enter,” and there we notice the change—the before and after. In fact, if we remove the film dissolve here, we are going to remove it here; a coarser change will be seen, there it is!
Remember that this method allows us to place them one by one, and sometimes it makes it a bit difficult for us to know which one suits us. For us to be able to use this thumbnail that we have here and for it to be much more effective, we have to follow the following steps. We are going to go to local disk C. We click here, and we are going to go to “Program Files.” We open it, and we are going to look for the Adobe folder; here we have it. After that, we are going to enter Adobe Premiere.
Internally, we are going to look for the folder named Lumetri. Now, we simply go inside LUTs, and this is where we have all the LUTs that already come by default in Premiere. If we want to include the folder that we downloaded, we have these two. We copy both, “Control + C,” and we are going to paste them, “Continue,” and here the two folders would be.
Once there, by default, initially, they will not be identified; however, we recommend that we close the Premiere project and re-enter. This is the best way to install LUTs in Adobe Premiere Pro permanently.
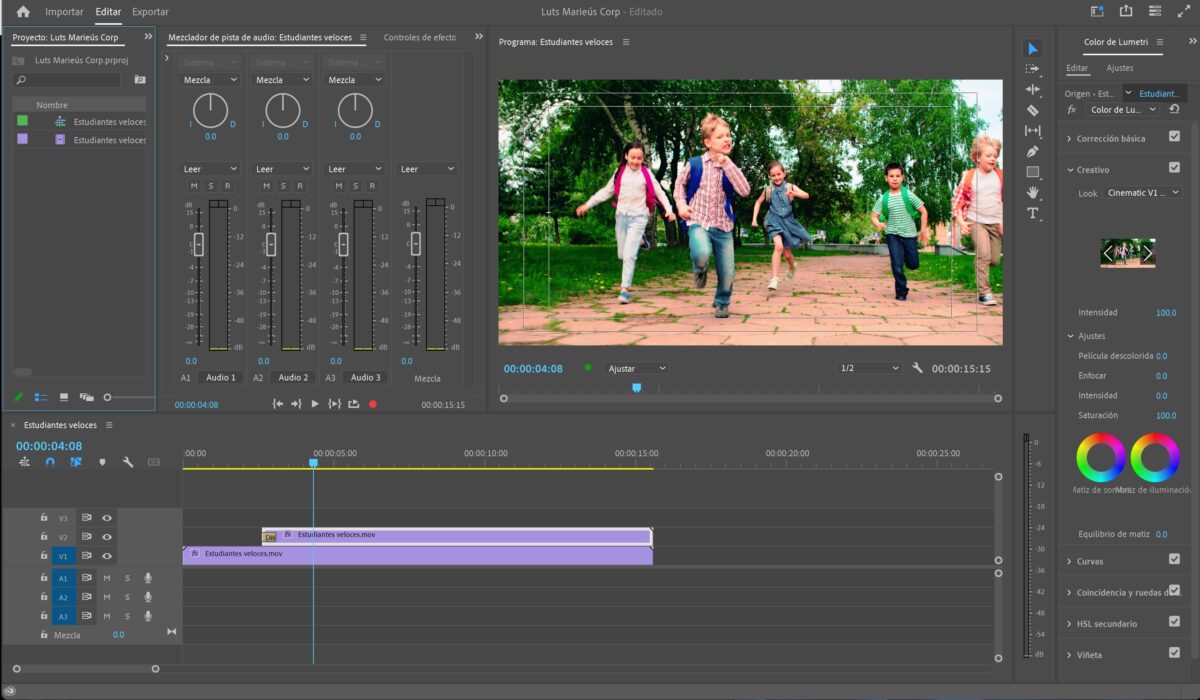
Applying Film LUTs in Adobe Premiere Pro.
Source: Author’s Own Work.
Final Results
So, we have re-entered again, and we already see clearly that they are all there, both the “Standard” and the “Log” that were inside the “Generic” folder. We select any one, and we are already making the changes here. For example, this is Log 19; we can perhaps opt for another. This is Log 20, 21, and so on. For example, if we finally opt for 22, we open this tab and select 22, there it is!
We have a before, and there we have an after. How would it look without the effect? There. With the effect? There it is. Now you know how to use the best LUTs in Adobe Premiere Pro for improved Color Grading. Done, thanks friends at Marieú Technology Corporation!

THE AUTHOR
Daniel Alejandro Montoya Godenzi
Alejandro, holding a Master’s degree in Administration and Project Management and a Mechatronics Engineer, has experience in digital technology projects. He is part of the Marieú Technology Corporation team. In his free time, he enjoys creating new projects, reading a book, or watching a series.





